
CargoLoader3D v1.1: What's New
This update lets you plan a single shipment across several containers or trucks, save and manage your shipments, export detailed PDF reports and share load plans via a link. Each topic is explained step by step below.
Multi-Space Loading Guide:
1. Select Your Spaces
Open the Spaces panel and switch to the All tab. Click a space to preview it: a “Previewing” label appears above the 3D view and the summary panel shows the space's dimensions, max load and volume. Click Select on the label and the space moves to the Selected tab, appearing as tab 1 in the space bar.
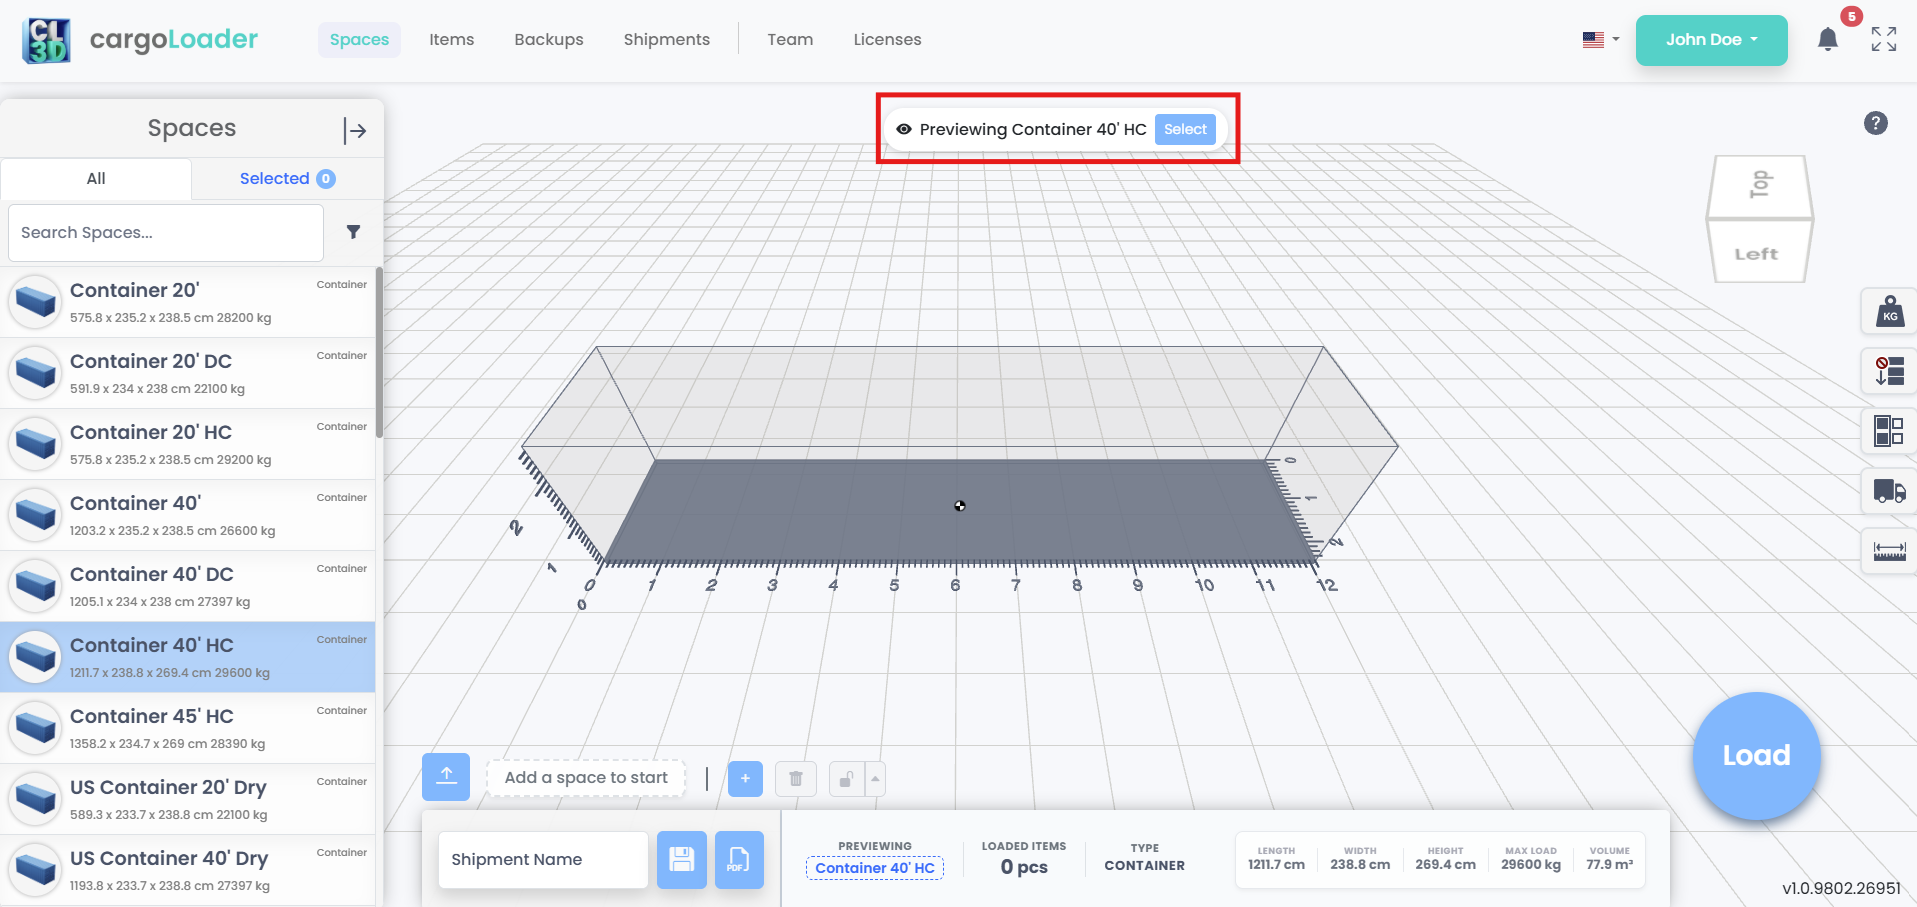
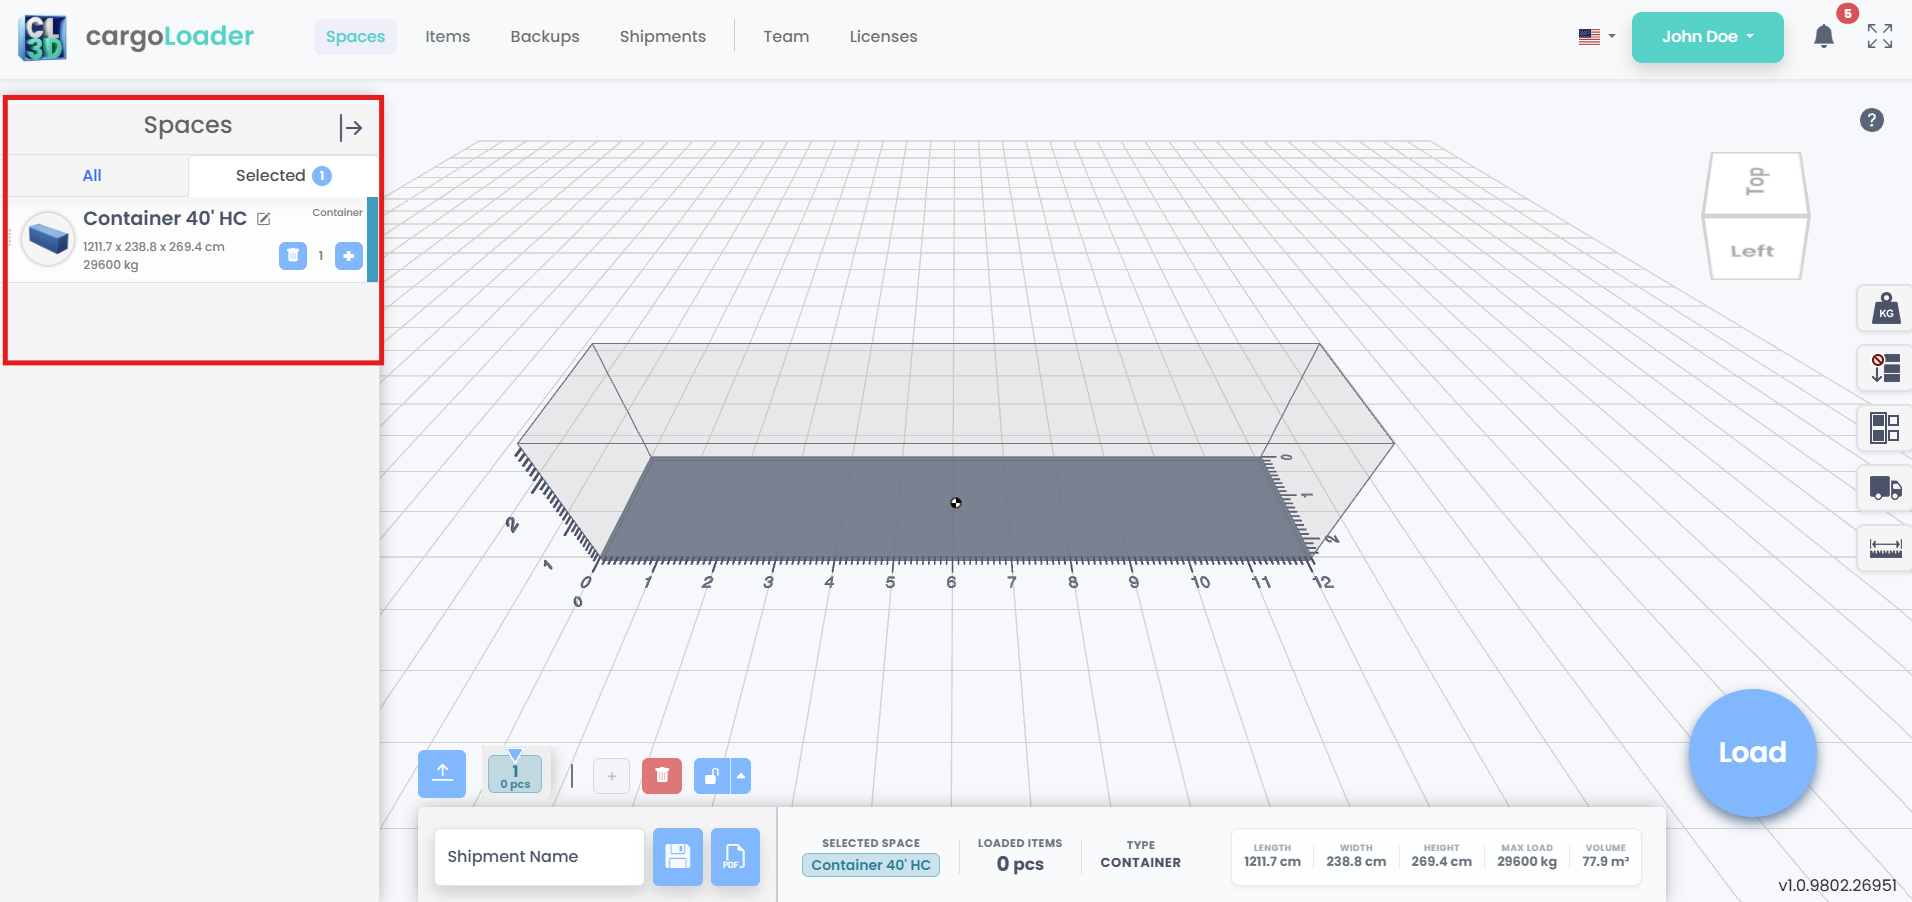
Preview a space and select it for the load plan.
2. Add More Spaces
Add as many spaces as your shipment needs. For the same type, click + on the space's card in the Selected tab; copies are numbered, for example Container 40' HC - 2. For a different type, preview it in the All tab and click Select, or hover over its image and click +. Each space gets its own color strip and numbered tab, and a badge in the All tab shows how many of each space type are in the plan.
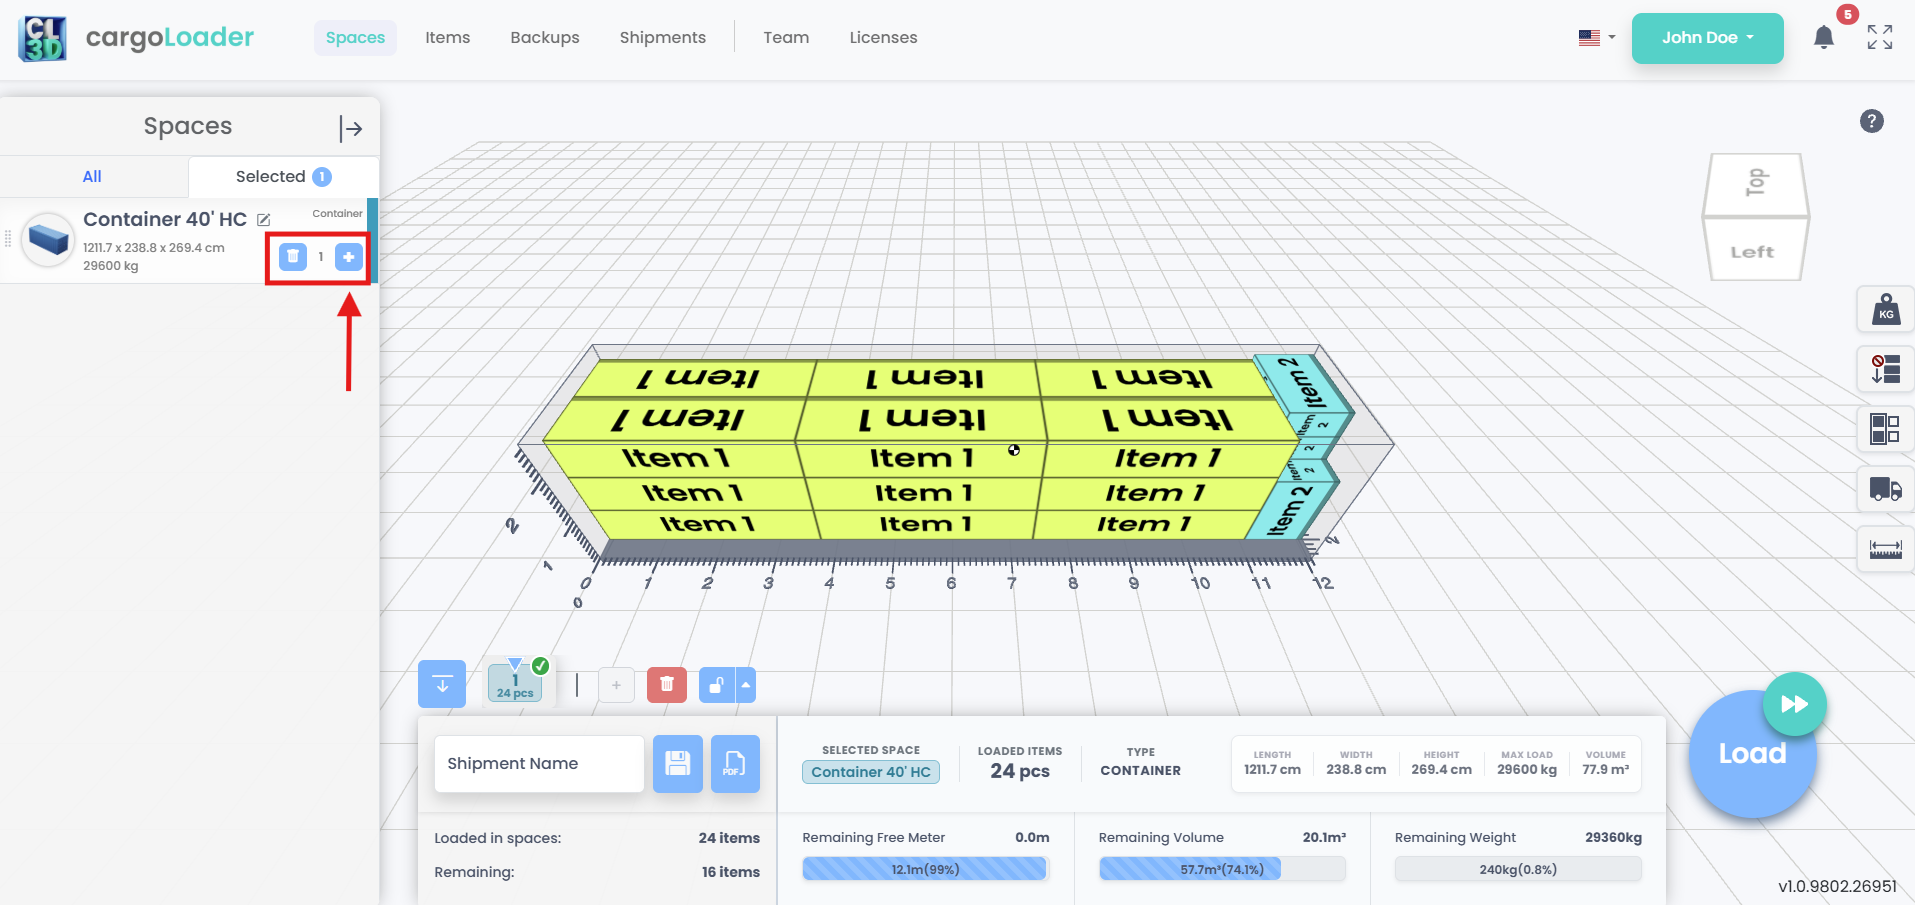
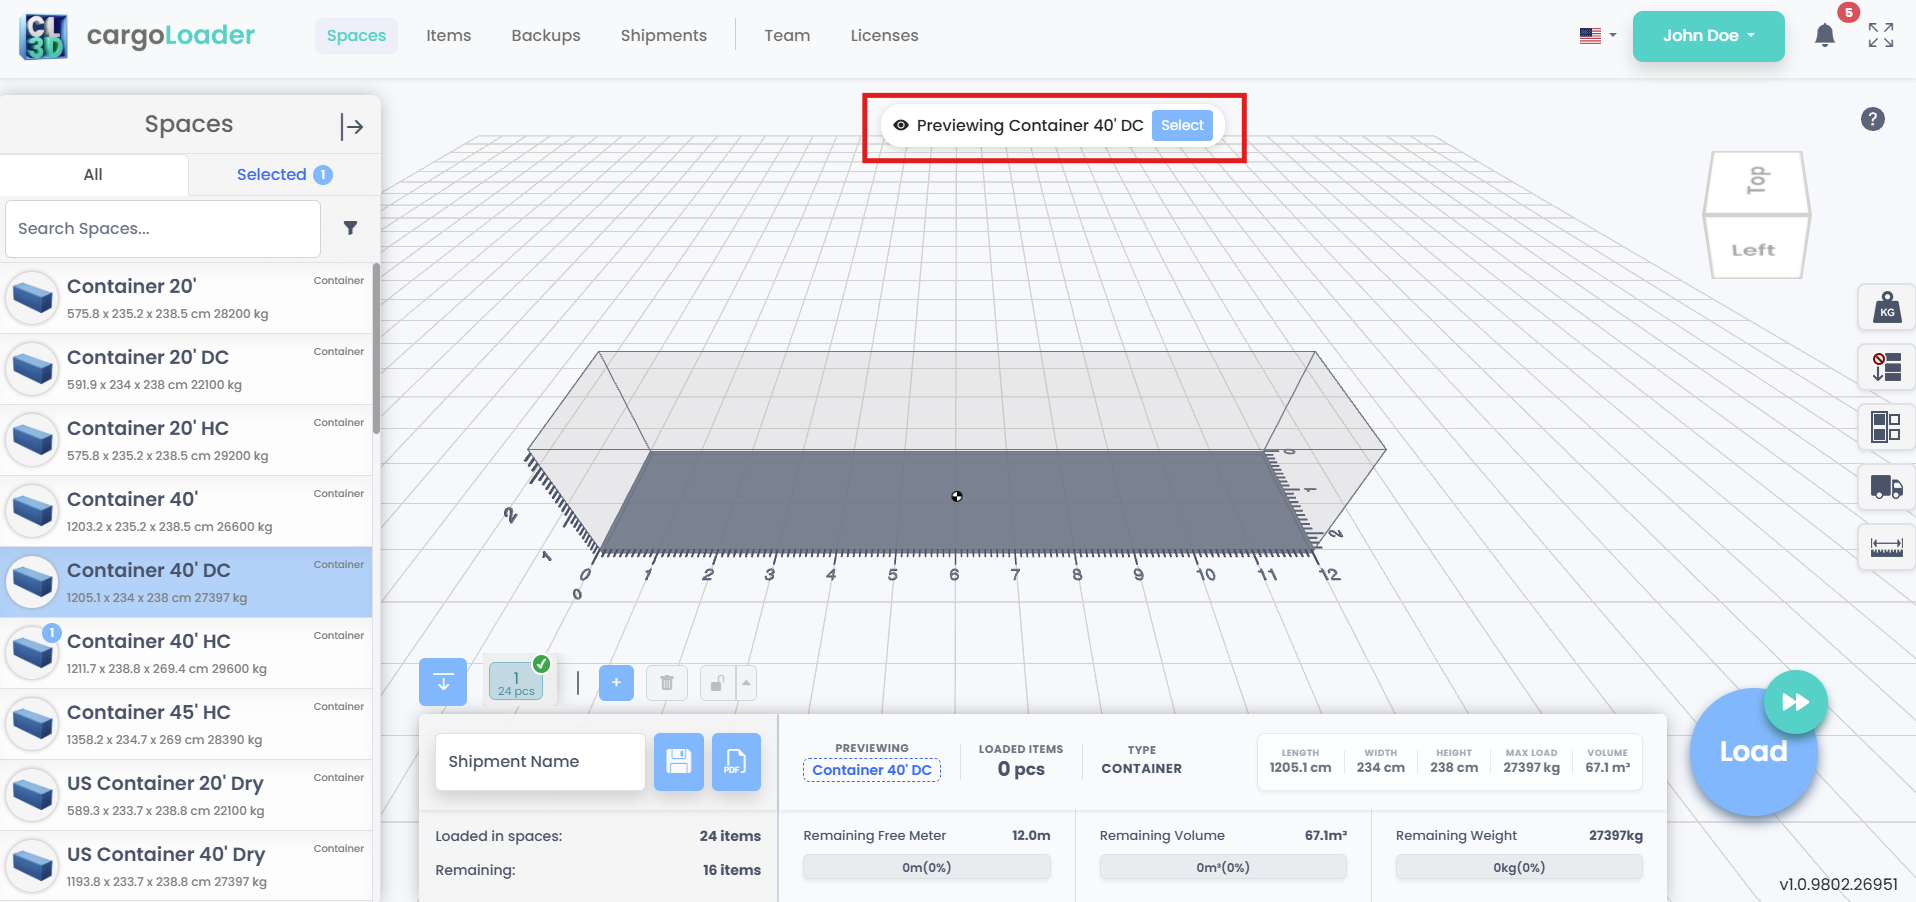
Add spaces of the same or a different type.
3. Manage Space Cards & Fill Order
Each card in the Selected tab can be renamed with the Edit icon, removed with Delete (or reduced by one copy with −), and duplicated with +. Spaces are filled in the order they appear in the Selected tab; drag a card up or down to change the order, and the tab numbers in the space bar update to match.
Rename, duplicate or remove spaces and drag cards to set the fill order.
4. Restrict Items to Specific Spaces
By default, an item can be loaded into any space. To limit it, click the item in the Items panel, open the All Spaces field and choose the allowed spaces. Expand a space type to pick specific copies, or use Select all and Clear. When you load, the item is placed only in the selected spaces.
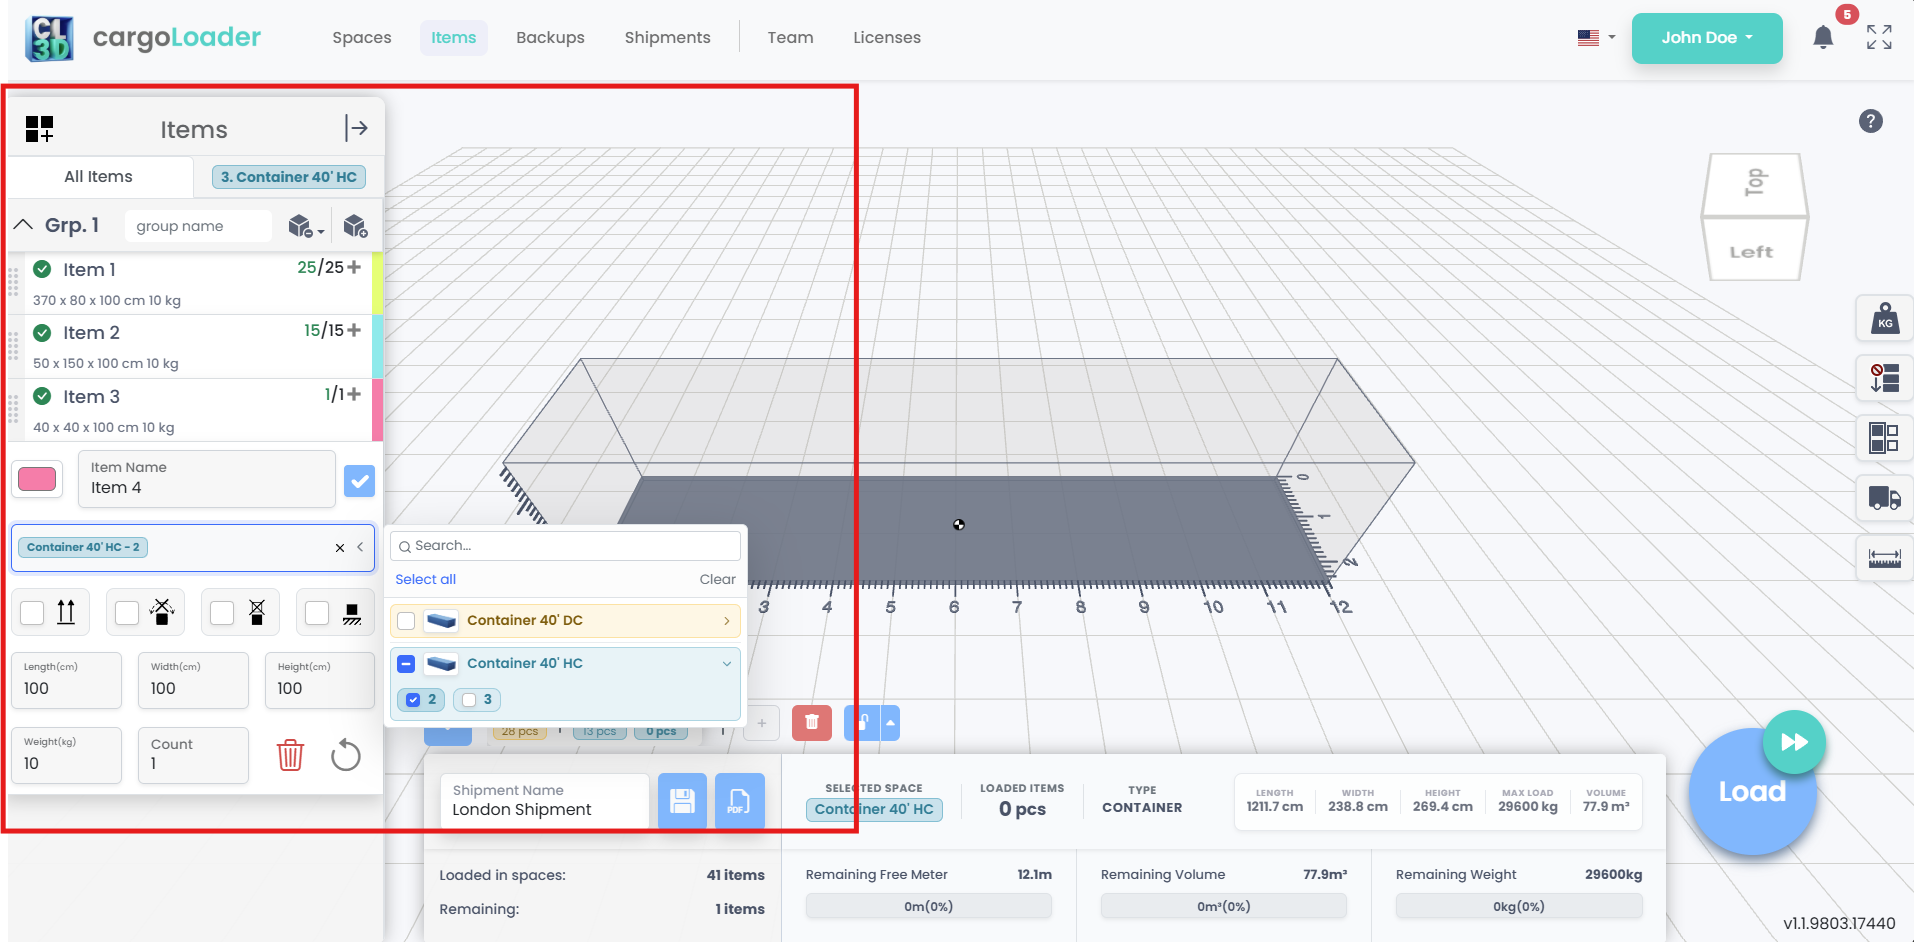
Choose which spaces an item can be loaded into.
5. Load the Plan & Continue with Remaining Items
Click Load and CargoLoader3D fills your spaces in order. The Items panel shows each item's loaded and total quantity, for example 18/25, with a green check when all units are loaded or a yellow warning when some couldn't be. If items are left over, add another space and click Continue: the remaining items go into the new space while already placed items stay where they are.
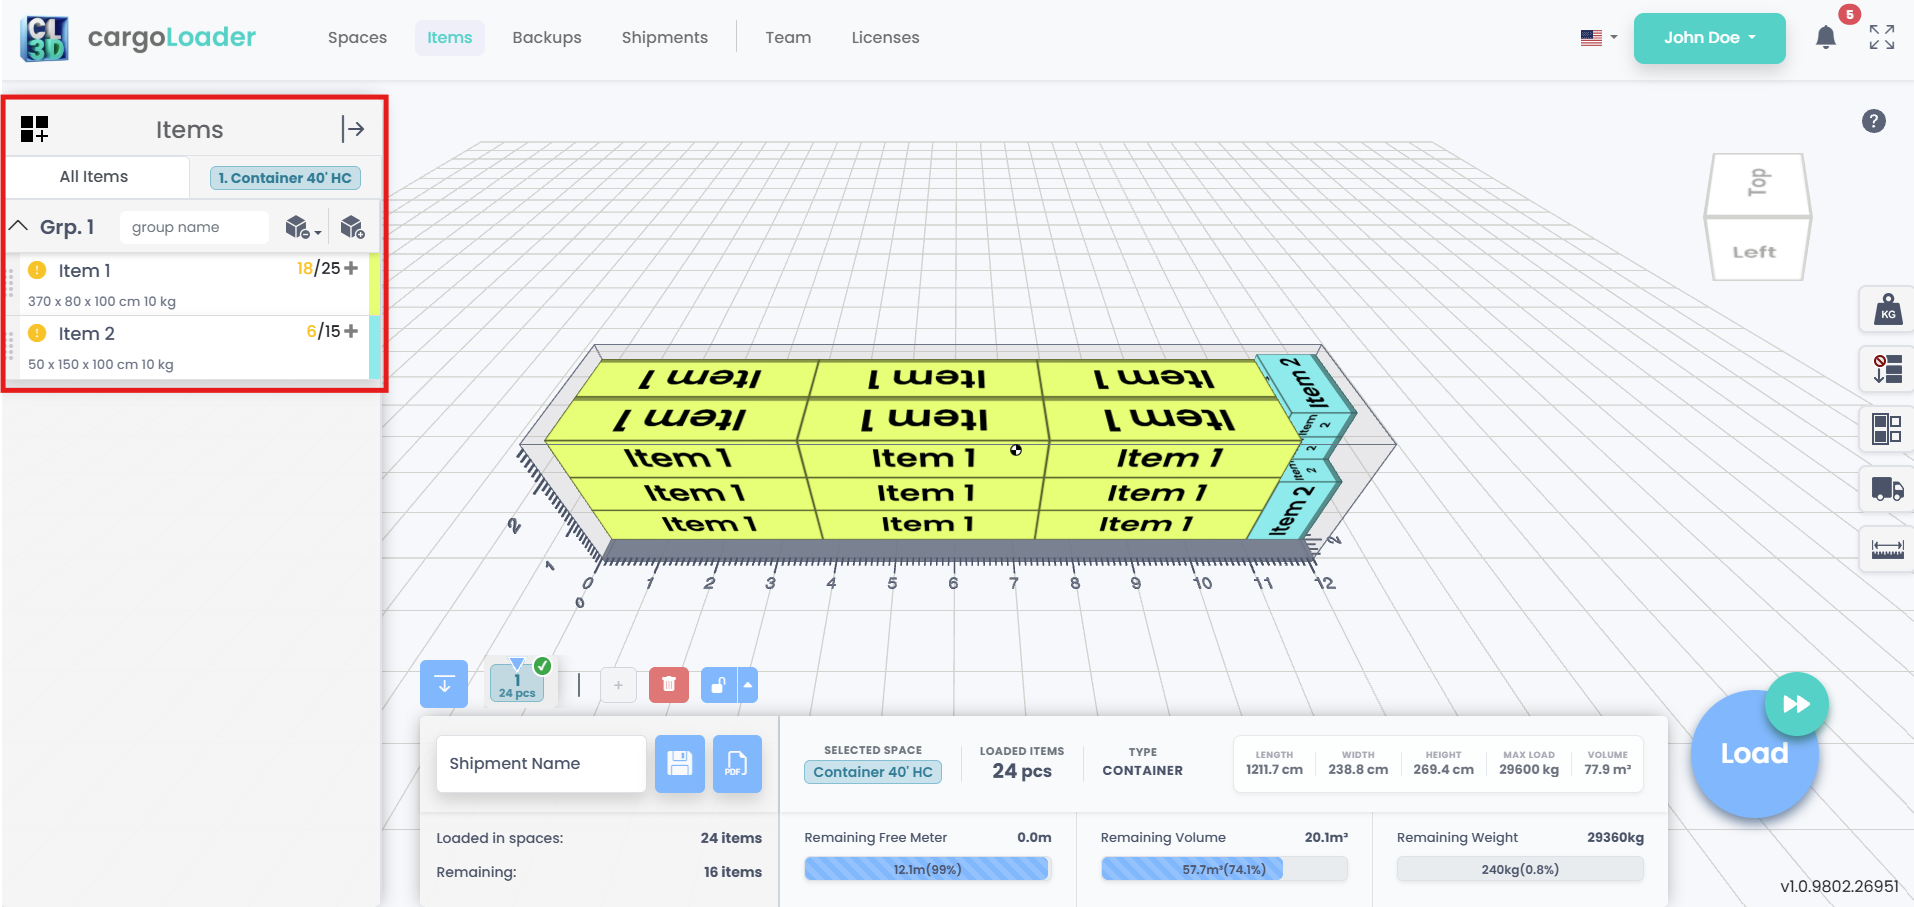
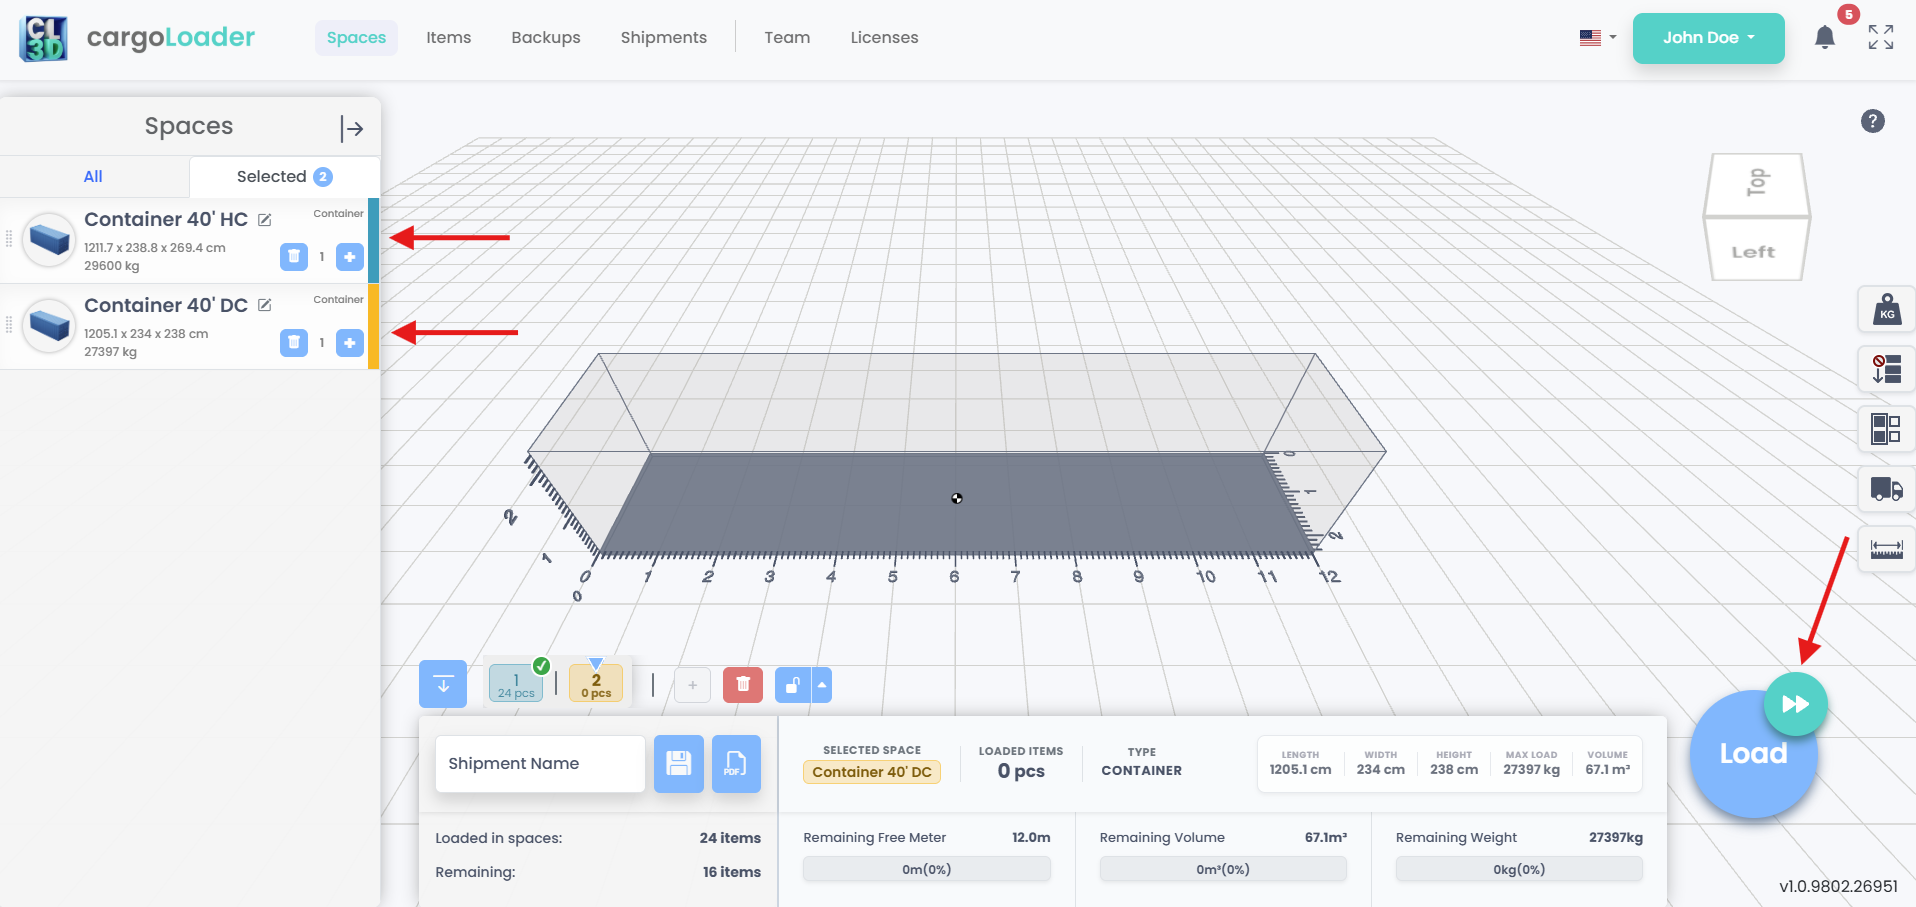
Load results and continuing with remaining items.
6. Load or Continue?
Both buttons work on all unlocked spaces. Load creates a new load plan from scratch, while Continue places only the items that aren't loaded yet into the free space — ideal after adding a space or new items. If you've changed the plan, Load warns you that loading again discards your changes. When everything fits, every tab shows a green check mark and Remaining shows 0 items.
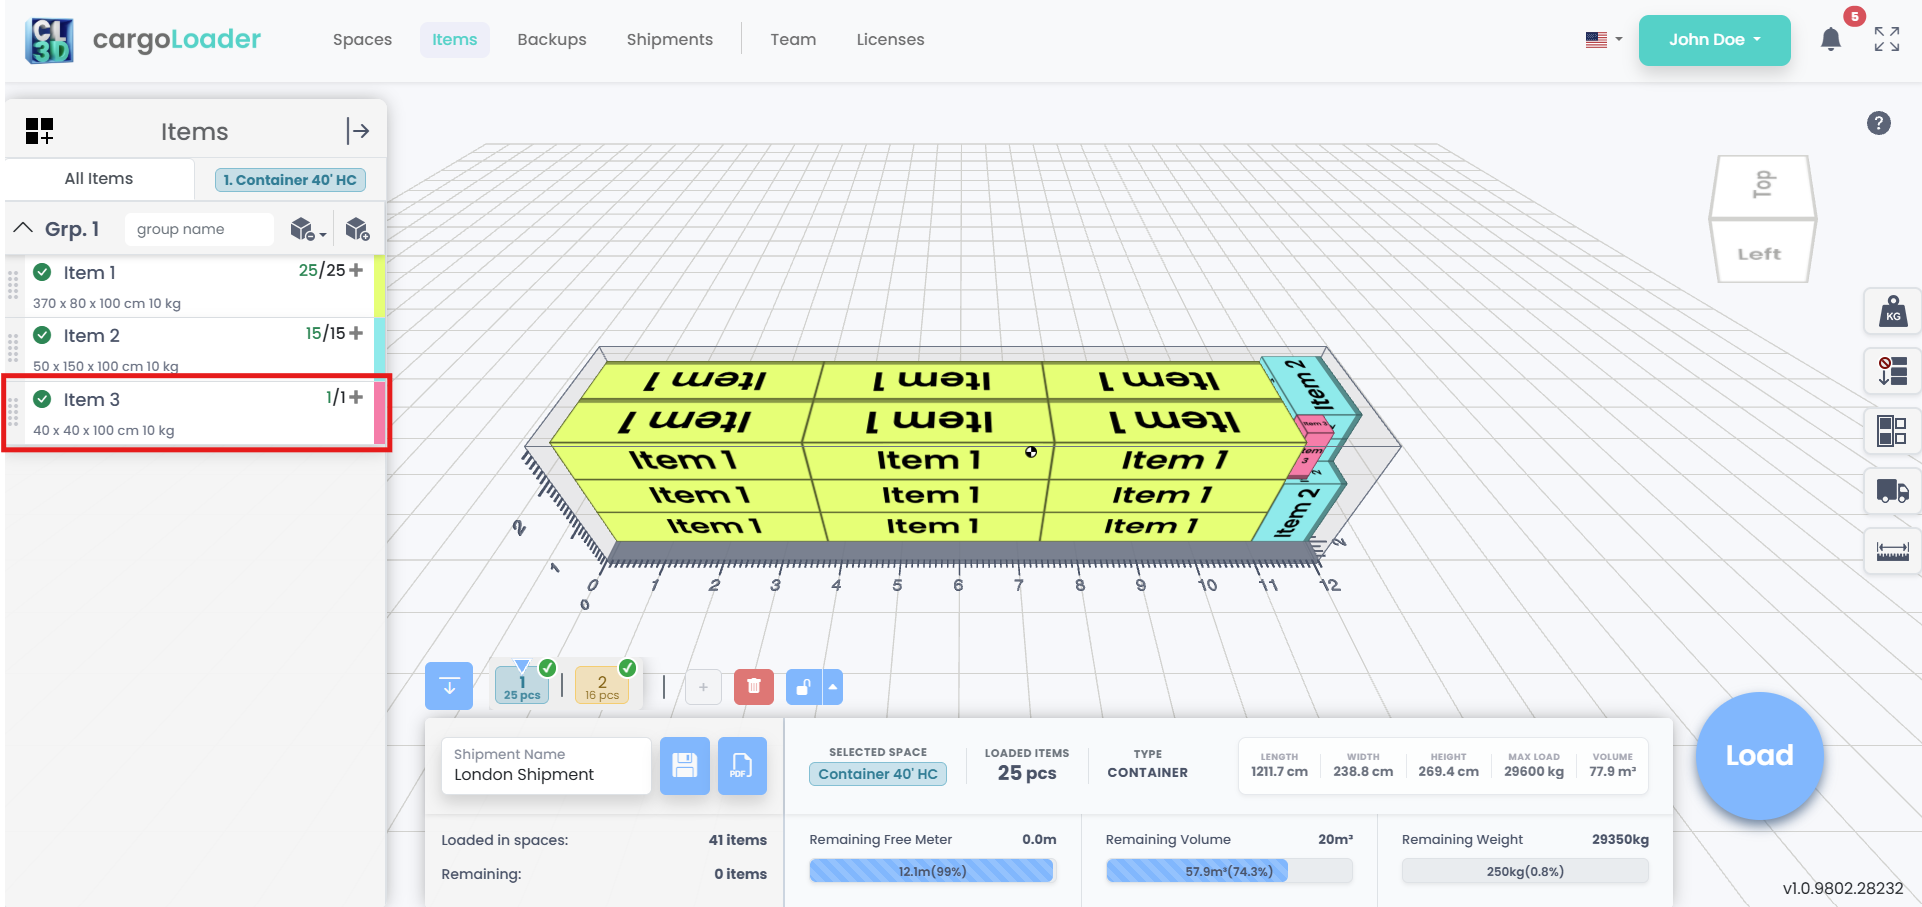
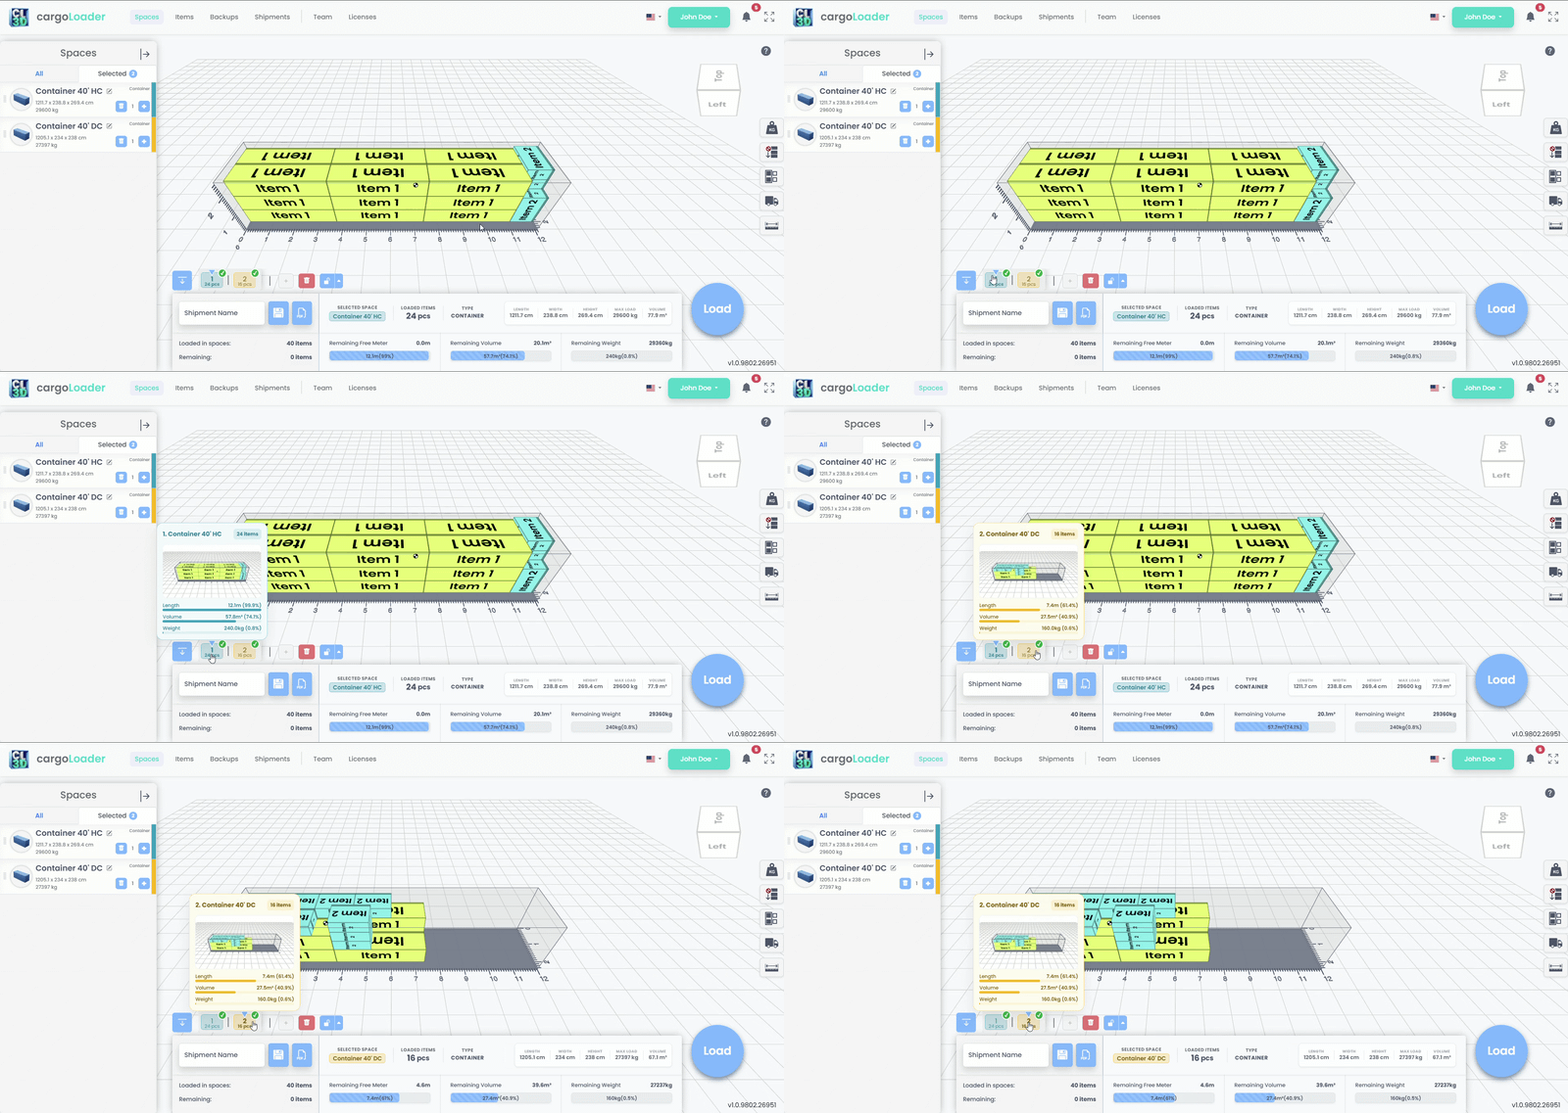
Load versus Continue and a fully loaded plan.
7. Lock Spaces
Lock a space to keep its load exactly as it is: Load, Continue and manual placement won't affect it. Click the space's tab in the space bar, then click the lock button. Use the arrow next to it to Lock All in This Group or Lock All Spaces at once.
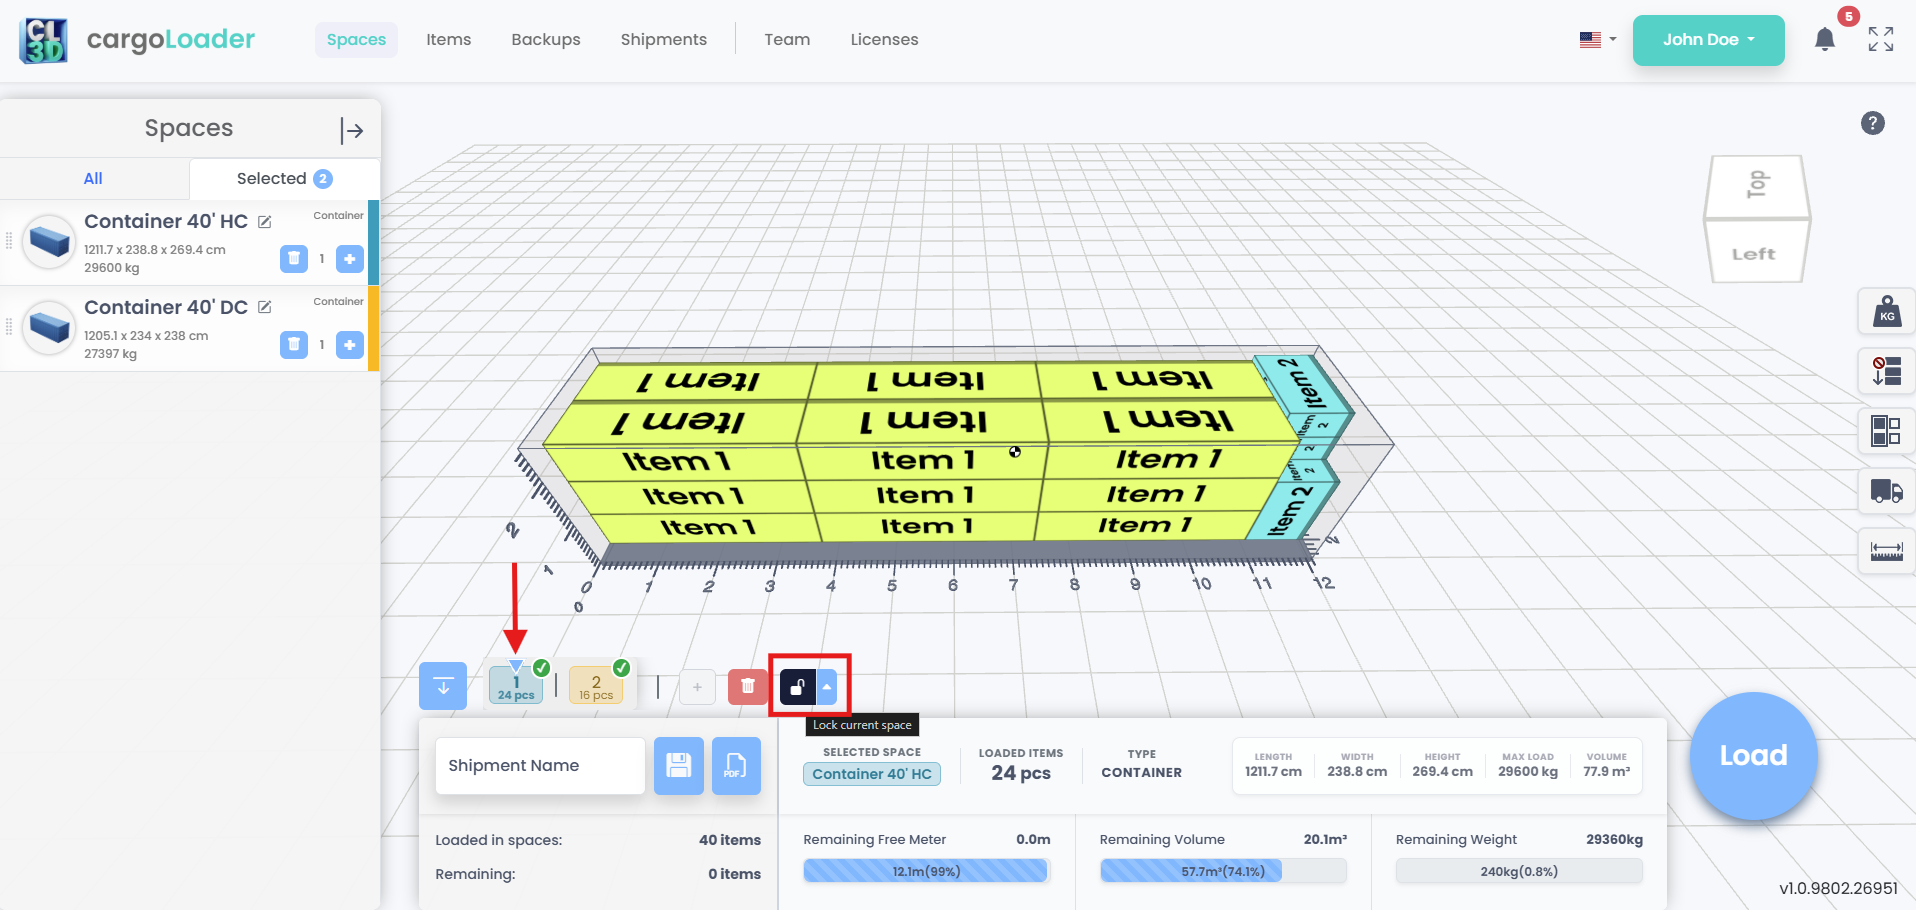
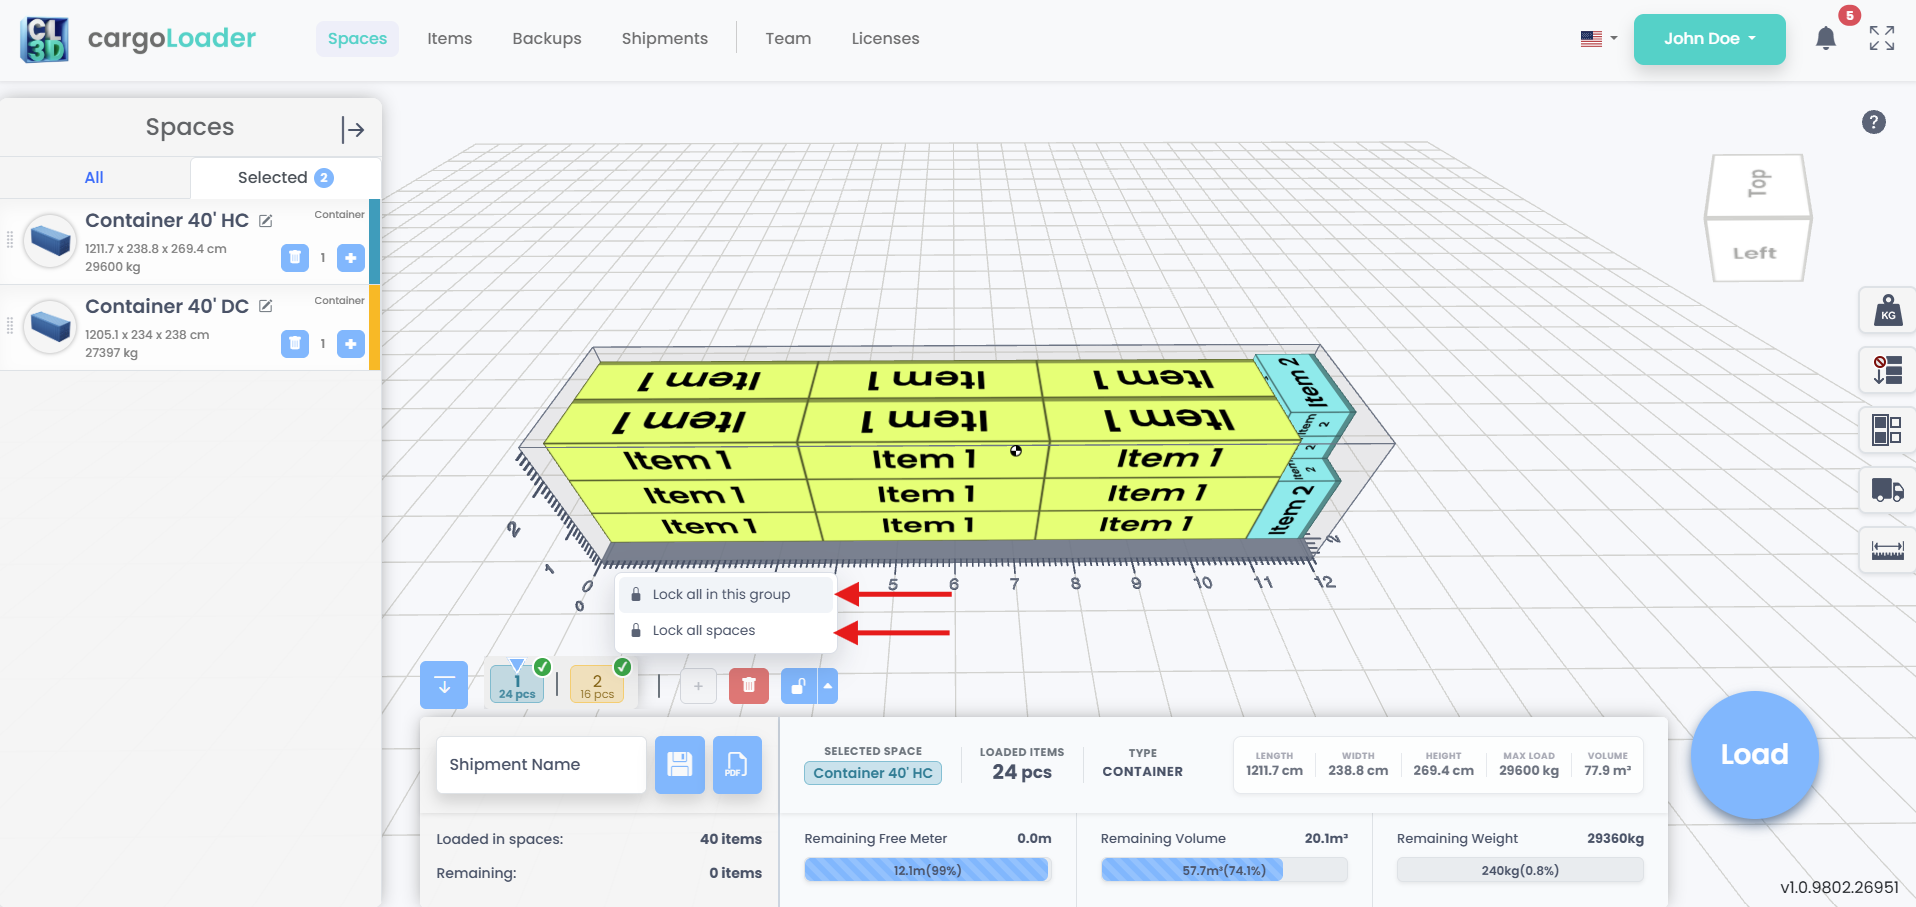
Lock a single space, a group or all spaces.
8. Space Bar & Items in Each Space
Each selected space has a numbered tab showing its item count and a green check once loaded; hover over it to see used length, volume and weight. In the Items panel, the tab next to All Items shows the space open in the 3D view, split into Loaded Items and Unloaded Items. It updates whenever you switch spaces.
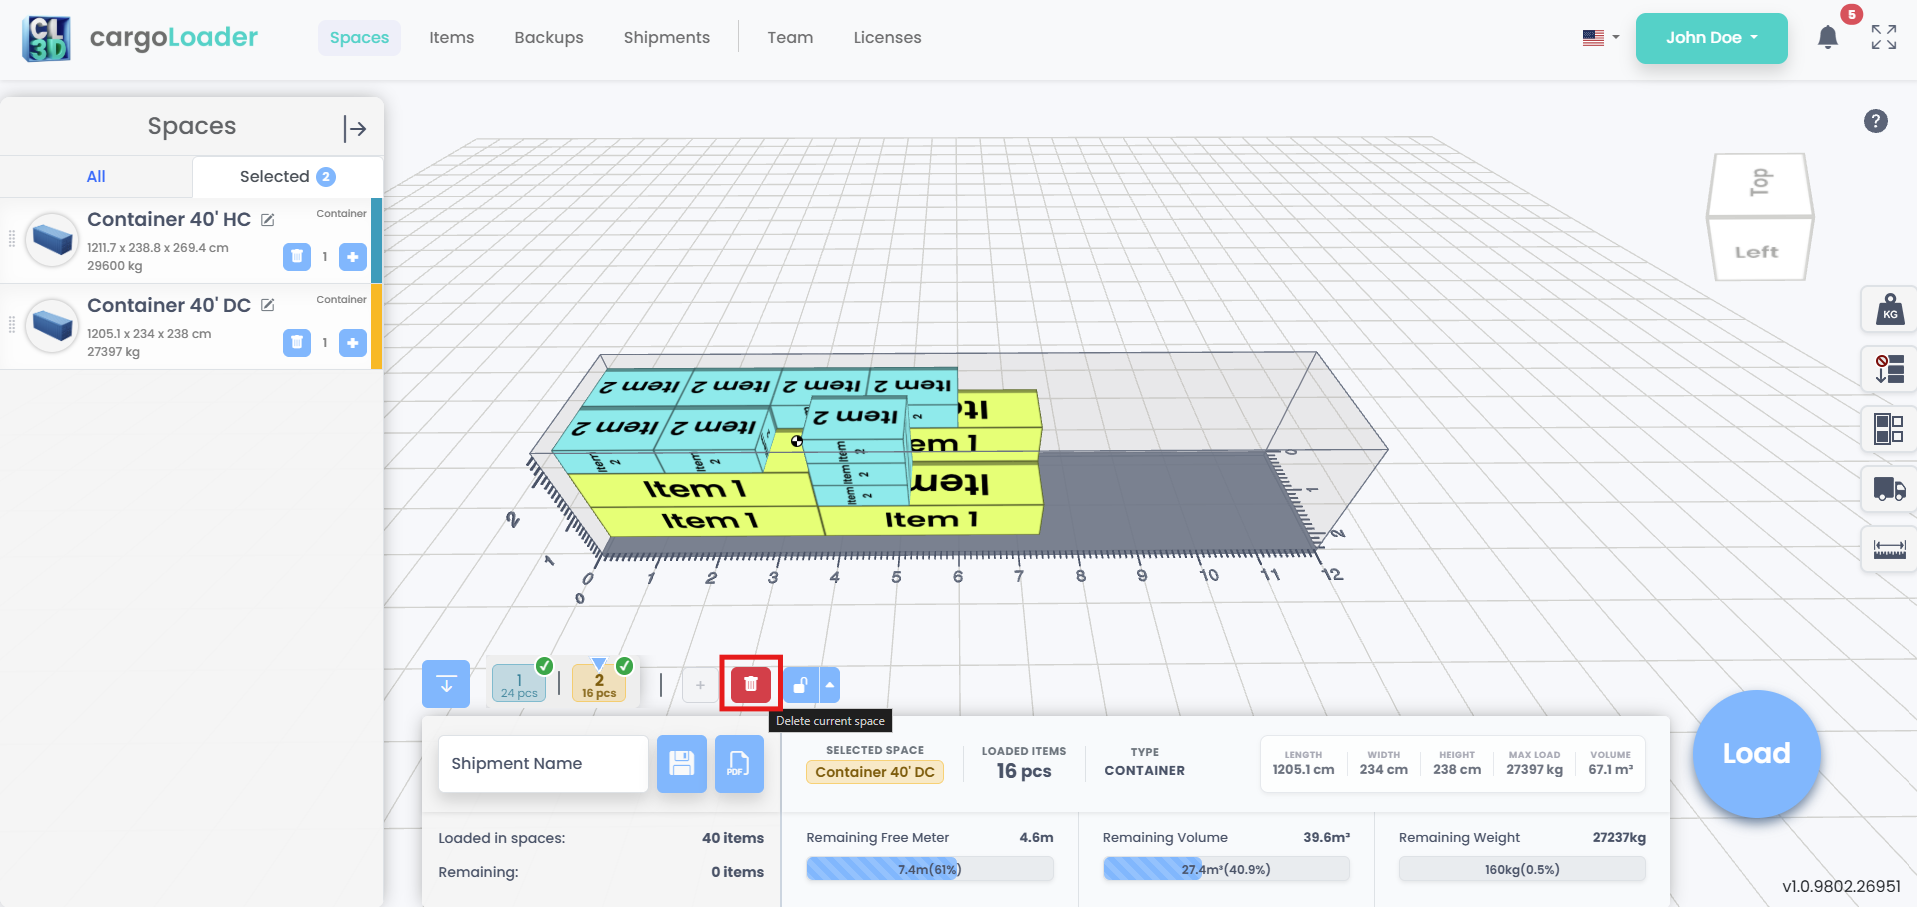
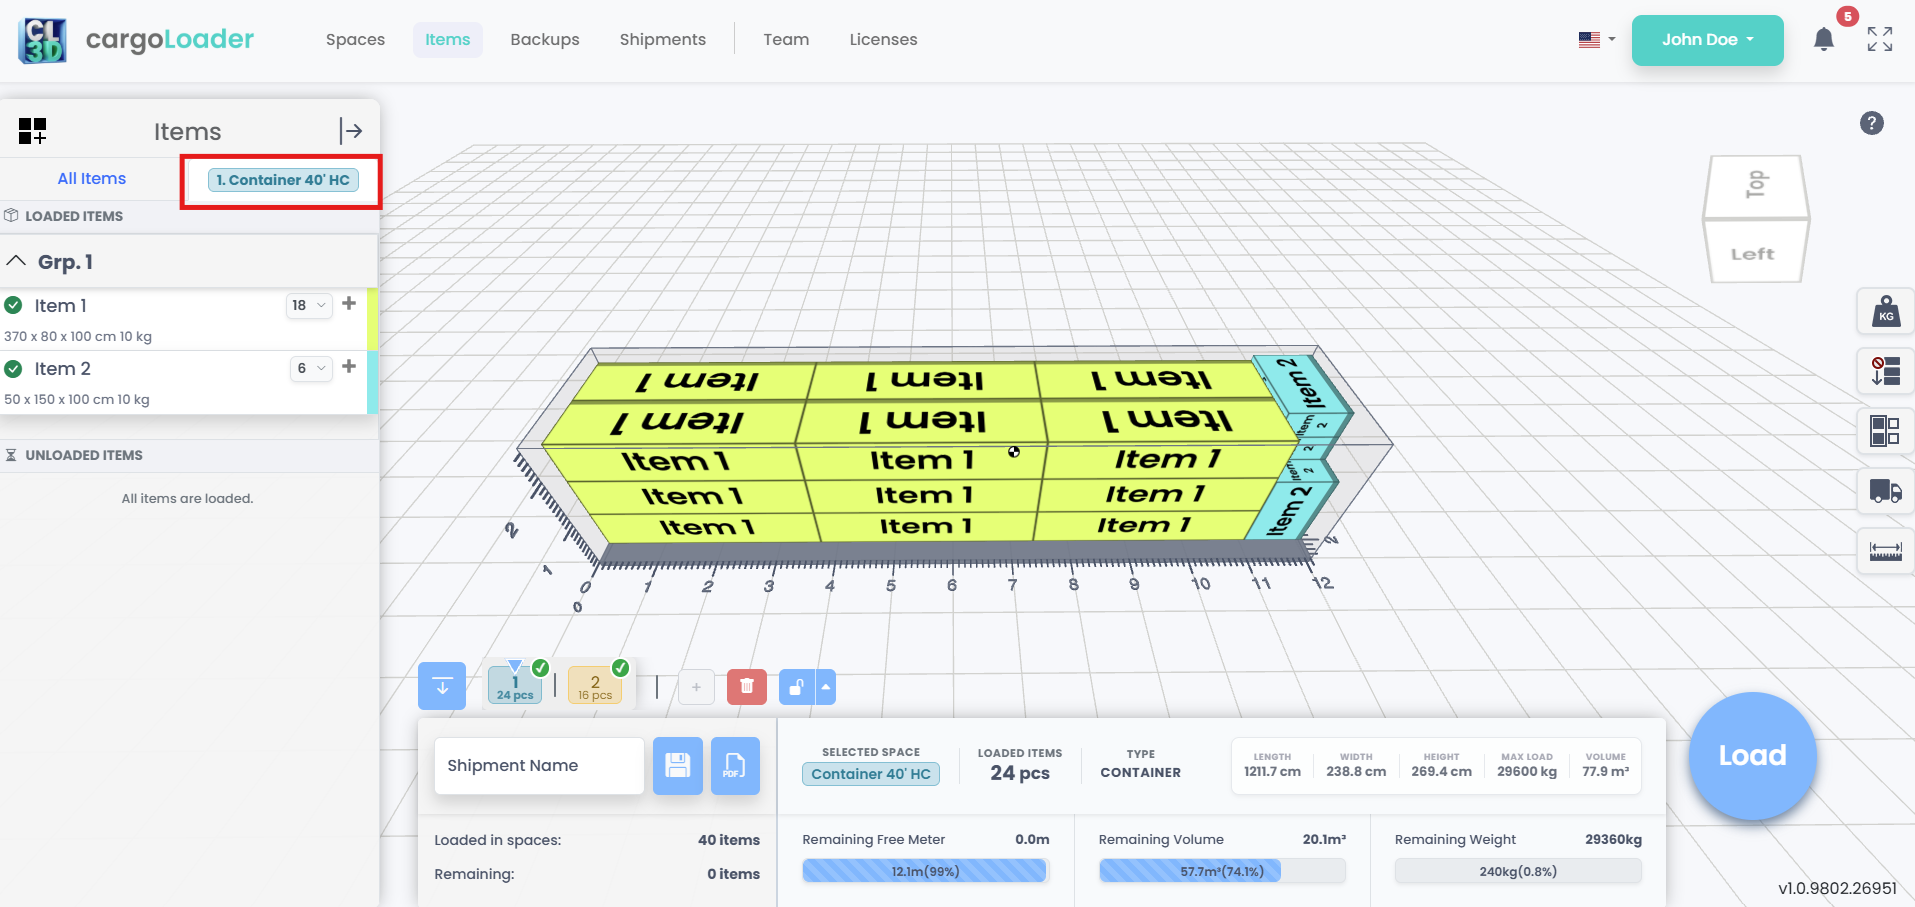
Space bar tabs and per-space item lists.
9. Item Distribution & Remaining Items
Open the quantity dropdown next to an item to see how its units are split across spaces. Units that couldn't be loaded appear under Unloaded Items with the count in red; add a space or free up room, then click Continue. Items restricted to other spaces show a red space icon and can still be placed in the current space with manual placement.
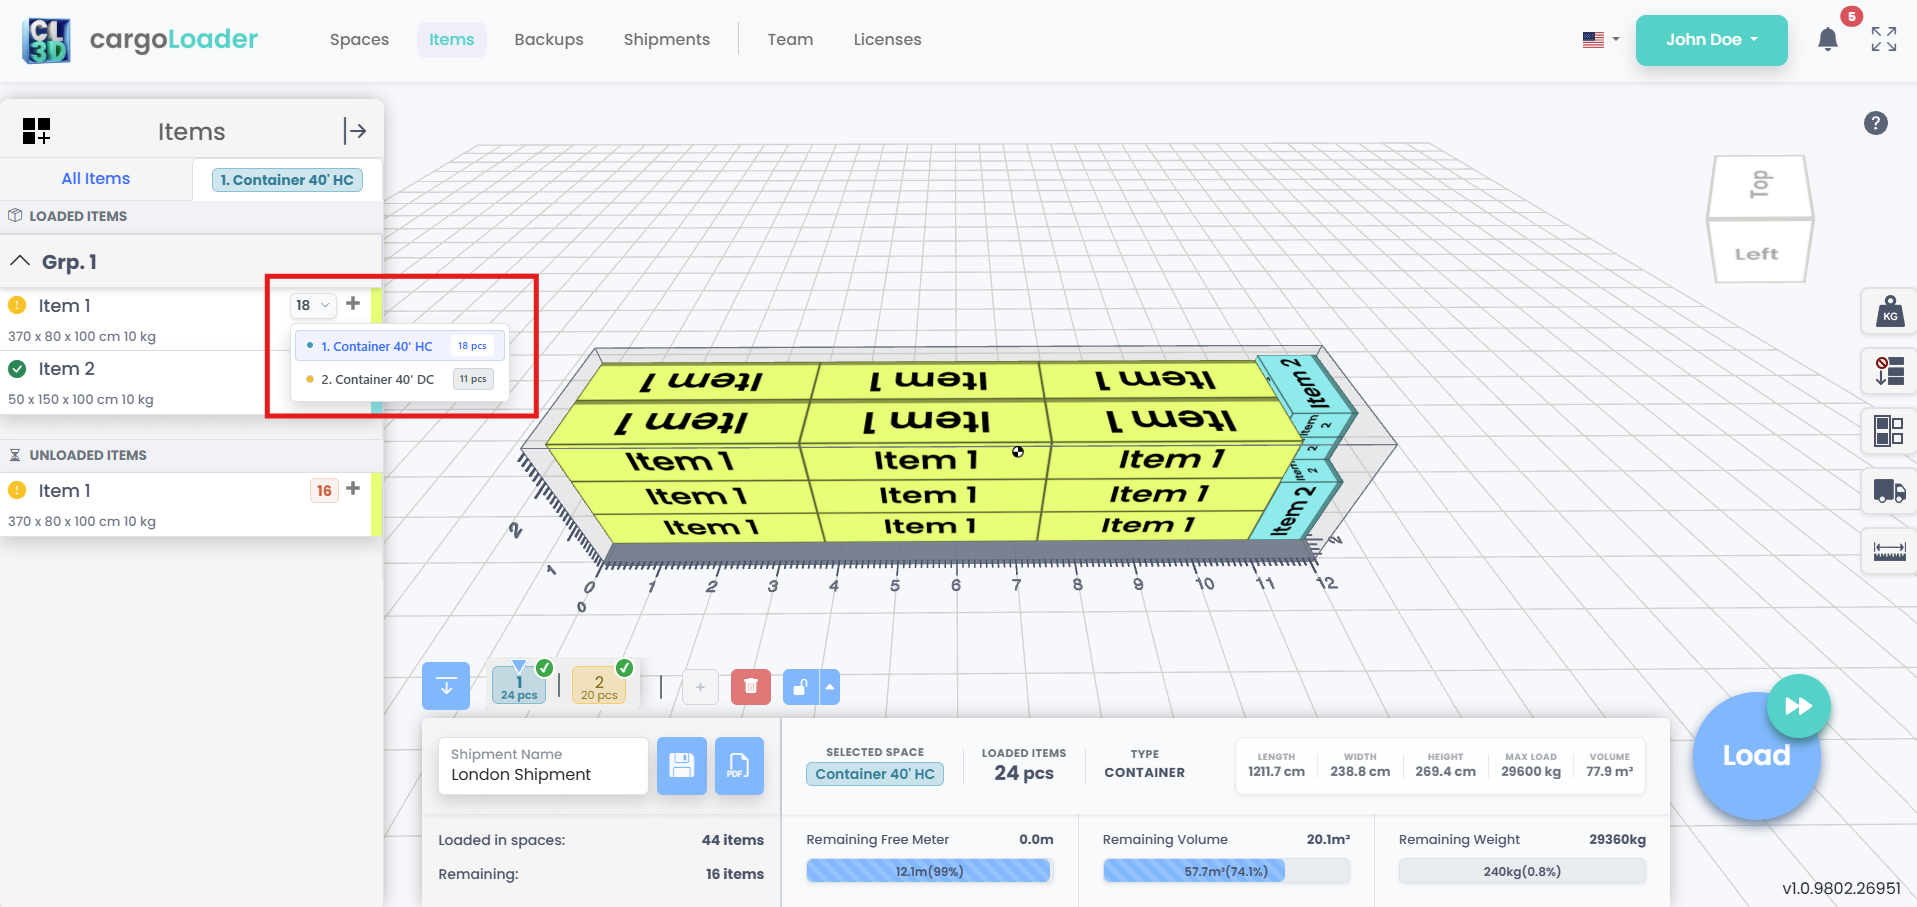
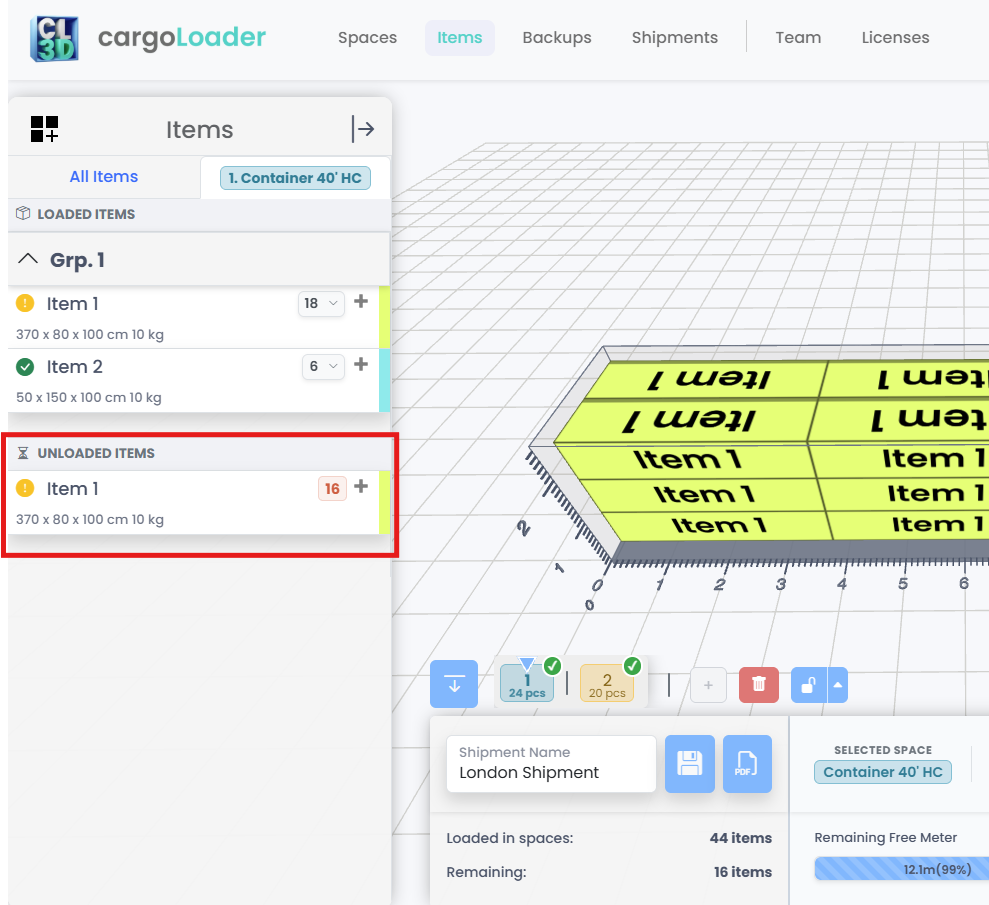
Distribution across spaces and remaining units.
10. Deleted Items & Summary Panel
Deleting an item from the Items panel keeps its placed units in the load plan; it stays under Loaded Items with an arrow icon you can click to add it back. The summary panel shows the selected space, items loaded in this space and across all spaces, remaining items, remaining free meter, and remaining volume and weight.
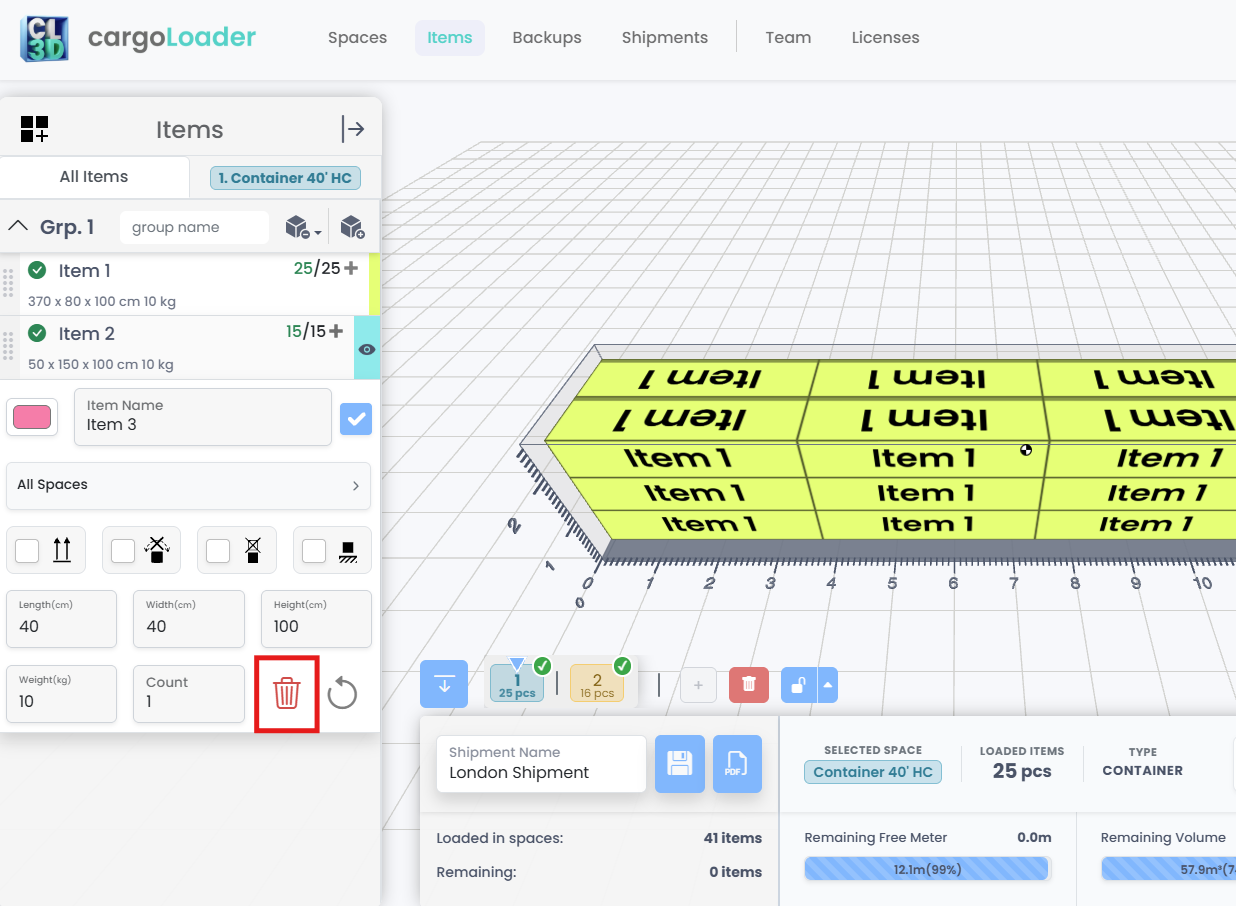
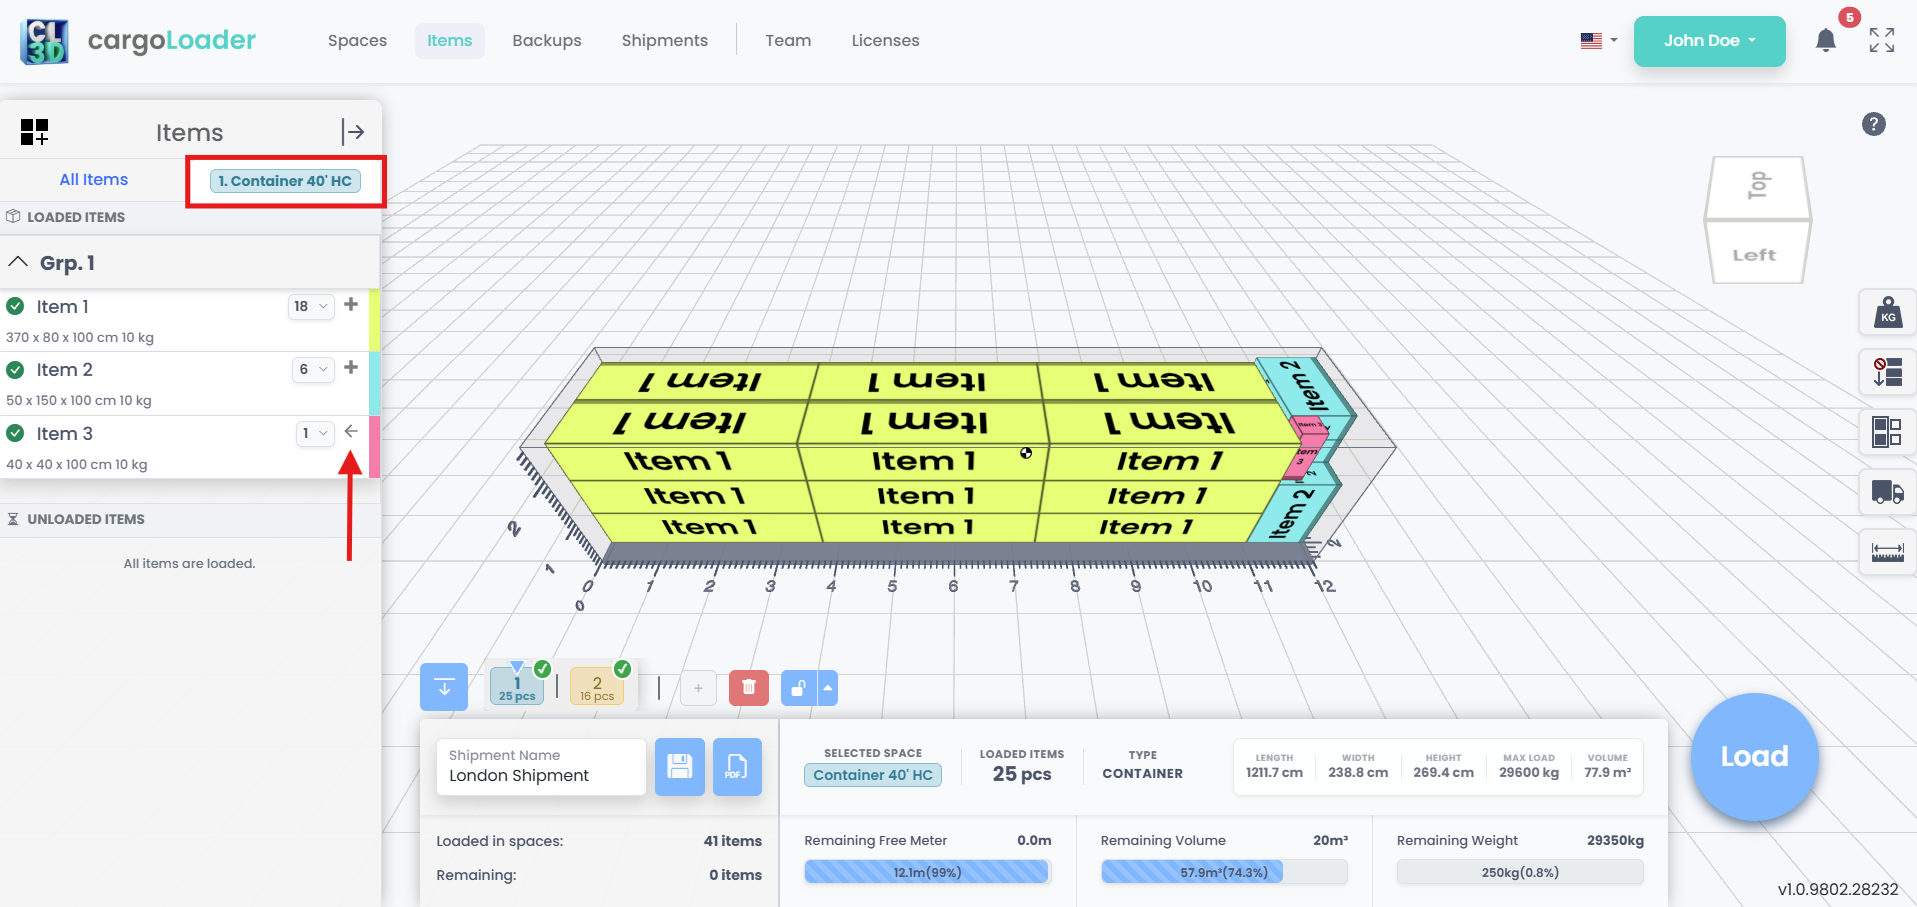
Restore deleted items and review the summary panel.
Saving Projects:
11. Saving a Shipment
After selecting a Space and placing your items inside, enter a name in the Shipment Name field at the bottom panel. Then click the save (disk icon) to store your work as a shipment.
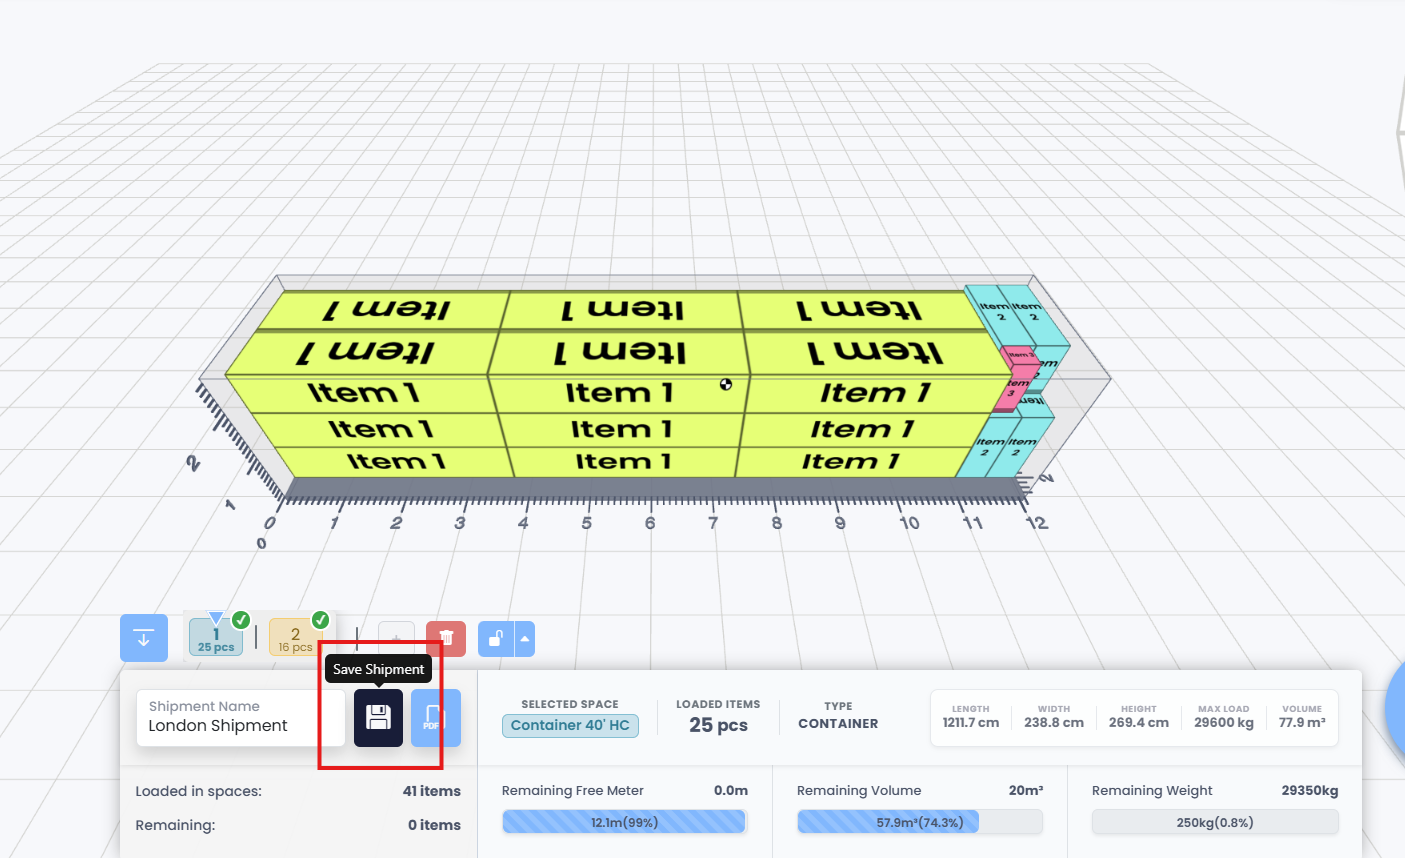
Saving a Shipment
12. Viewing Saved Shipments
Once saved, open the Shipments tab in the top menu to see all saved shipments in the Saved Shipments window. Each row in the list shows the following:
- Shipment Name
- Space Name: the first space in the shipment. If the shipment has more than one space, the number of extra spaces is shown below it (for example, +1 space).
- Space Type
- Created Date
- User: the person who saved the shipment.
You can sort the list by clicking any column header. You can also filter it by typing in the search boxes under Shipment Name, Space Name, Space Type and User.
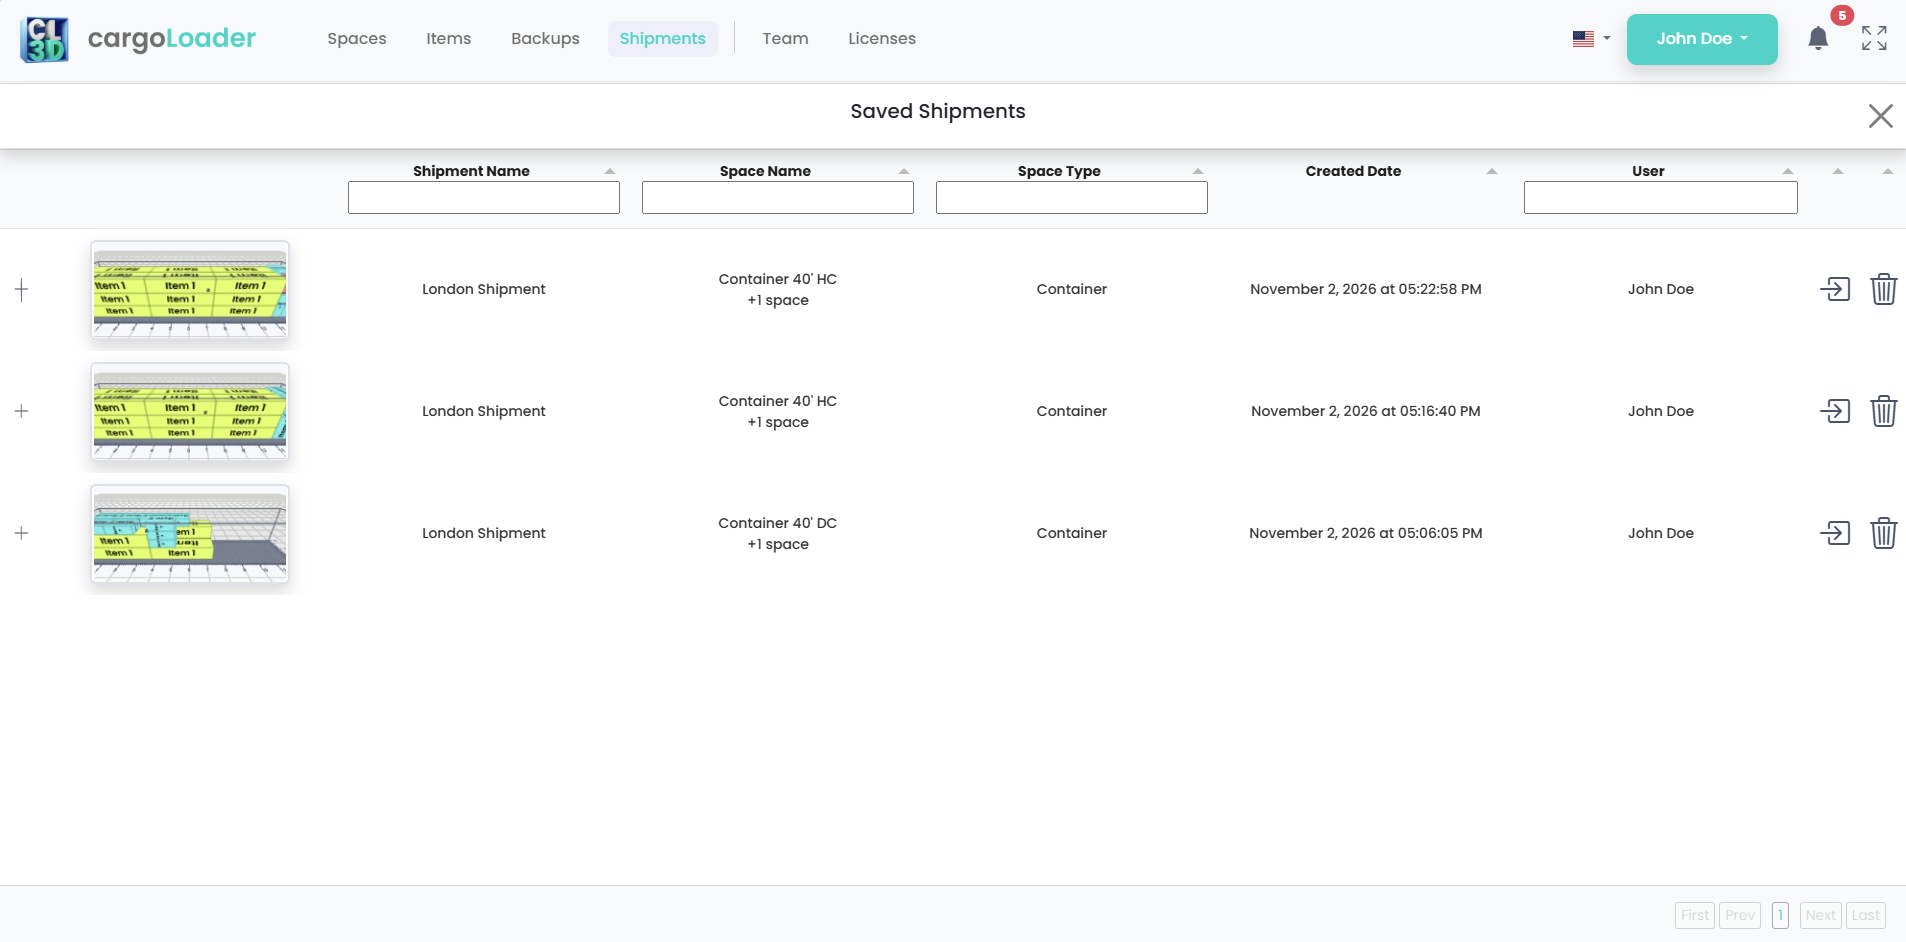
Viewing Saved Shipments
13. Viewing the Spaces in a Shipment
Click the + icon on the left of a row to expand it. Each space in the shipment then appears as a numbered card showing a preview, the space name and the space type. To open a single space, click the open icon on its card.
14. Row Actions
- Open (arrow icon): loads the shipment into the planner.
- Delete (trash icon): removes the shipment from the list.
If there are many saved shipments, use the First, Prev, Next and Last buttons at the bottom to move between pages. Click X in the top-right corner to close the window.
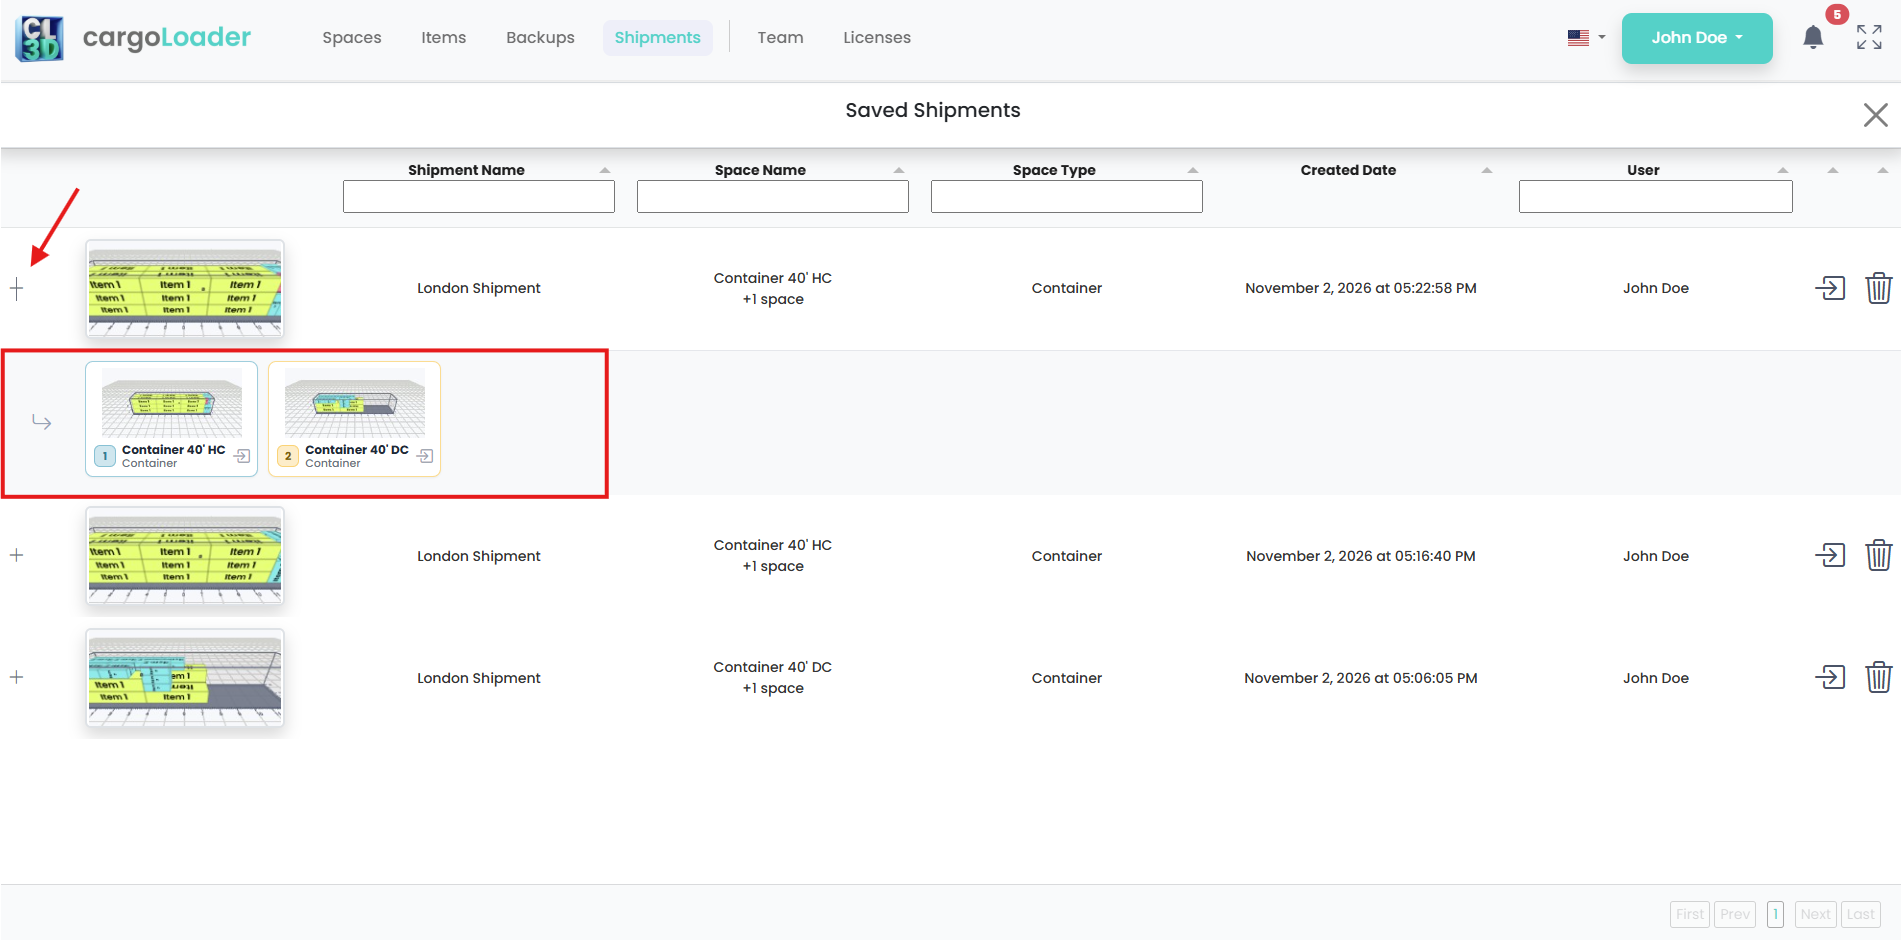
Row Actions
Exporting to PDF:
15. Generating a Report
After completing a shipment, click the Get Report (PDF icon) button in the bottom panel. This will redirect you to the Report page (https://app.cargoloader3d.com/Report).
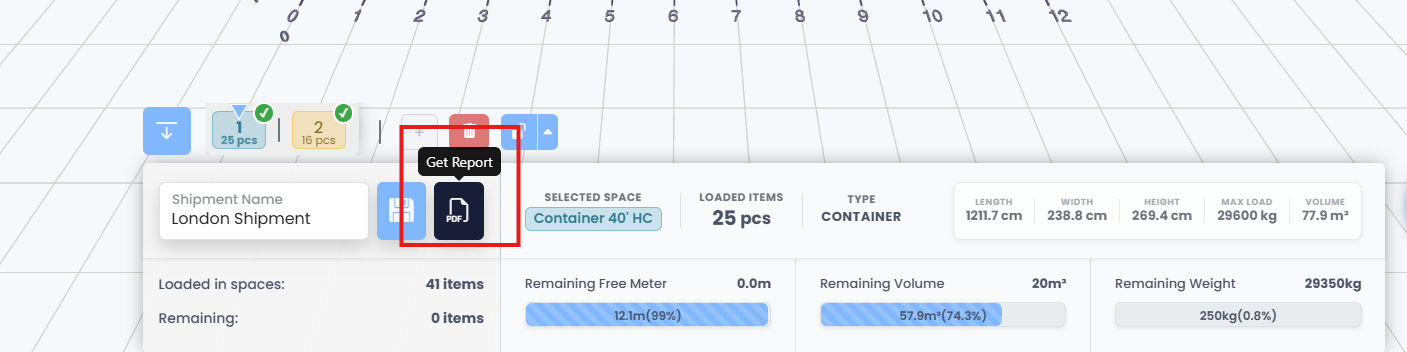
Generating a Report
16. Report Content
The Report page has two parts: the shipment overview on the left, and the details of the selected space (or of all packed items) on the right.
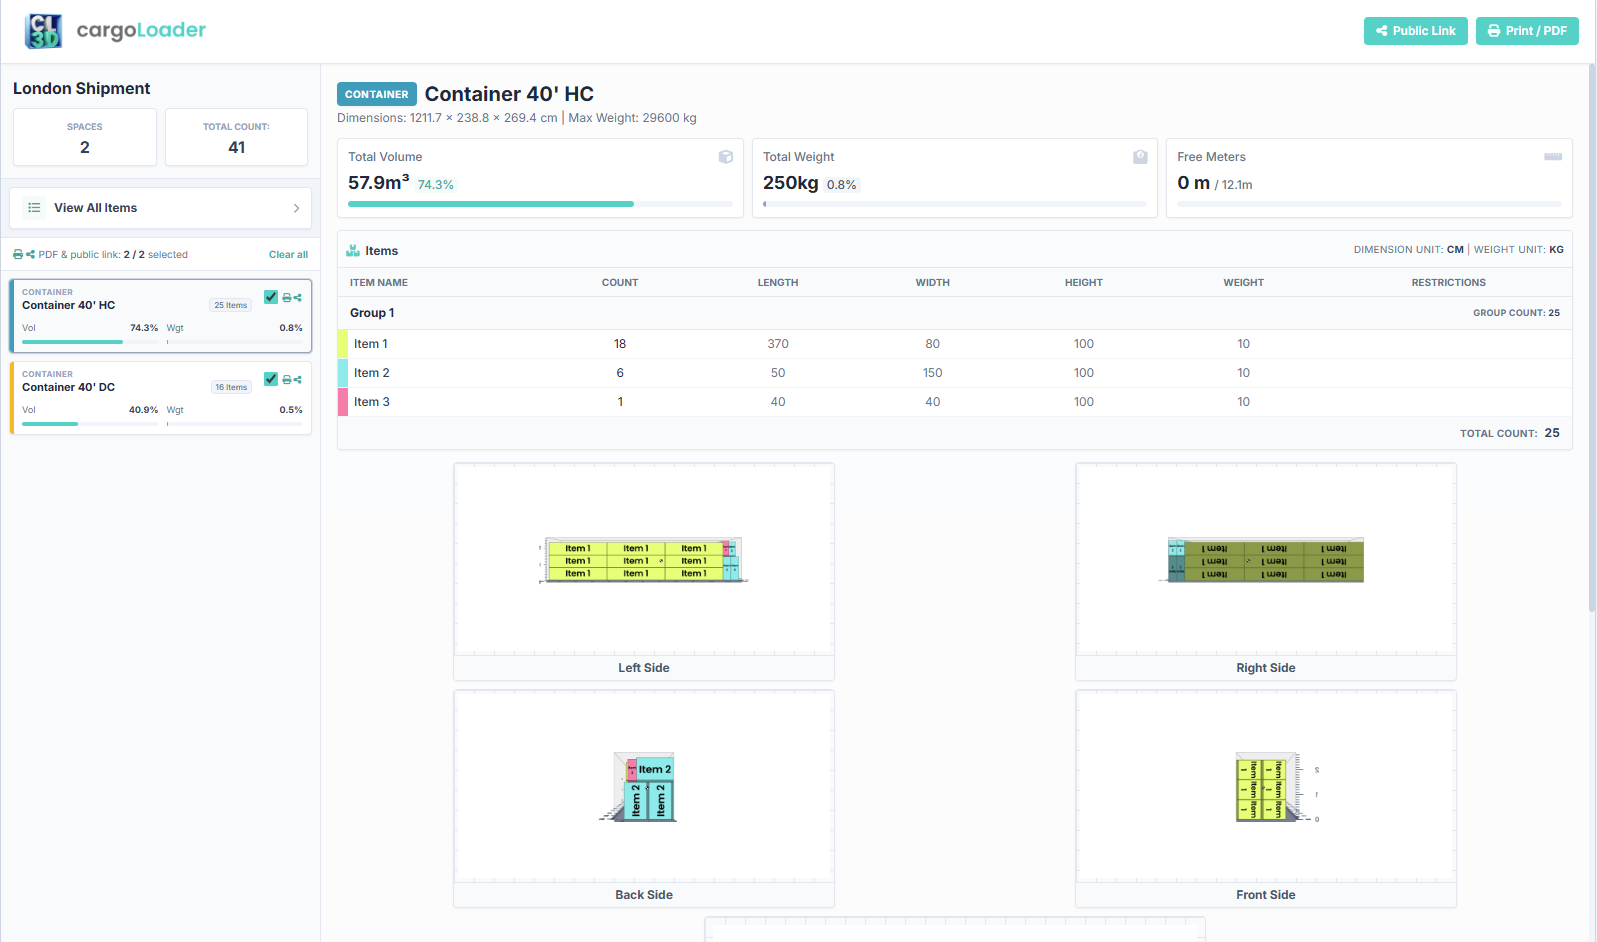
Report Content
1. Shipment Overview (Left Panel)
The left panel shows the shipment as a whole and the spaces it contains:
- Shipment name, with the number of Spaces and the Total Count of items across all spaces.
- View All Items: shows a combined list of every item in the shipment (see step 5).
- Space cards: each space is listed with its type, name, item count, and volume (Vol) and weight (Wgt) usage bars. Click a card to show that space's details on the right.
- PDF & public link selection: use the checkbox on each card to choose which spaces are included in the PDF and the public link. The counter shows how many are selected (for example, 2 / 2 selected). Click Clear all to clear the selection.
2. Space Header & Summary
Displays the selected space's type (for example, CONTAINER), its name, its dimensions and its maximum weight. Below this, three summary cards show:
- Total Volume: used volume and its percentage of capacity.
- Total Weight: total cargo weight and its percentage of the maximum weight.
- Free Meters: the remaining free loading length out of the total length.
3. Item List (Dimensions & Weights)
A table of all items in the selected space, organized by group. It includes:
- Item name, count, length, width, height, weight and restrictions.
- A color marker for each item that matches its color in the load plan views.
- The dimension and weight units in use (for example, CM and KG), set in Unit Settings. Group counts appear next to each group, and the total count is shown at the bottom of the table.
4. Visual Layout: Multi-Perspective Views
Previews of the load plan from several viewpoints (Left Side, Right Side, Back Side, Front Side). Use them to check placement, stacking and clearance before finalizing.
5. All Packed Items
Click View All Items in the left panel to see every item in the shipment on a single page. The All Packed Items view shows the total number of spaces and lists the items grouped by space:
- Each space appears as a section with its name, its type and its Space Total (the number of items in that space). Each item also shows the group it belongs to.
- The Grand Total at the bottom shows the number of items across all spaces.
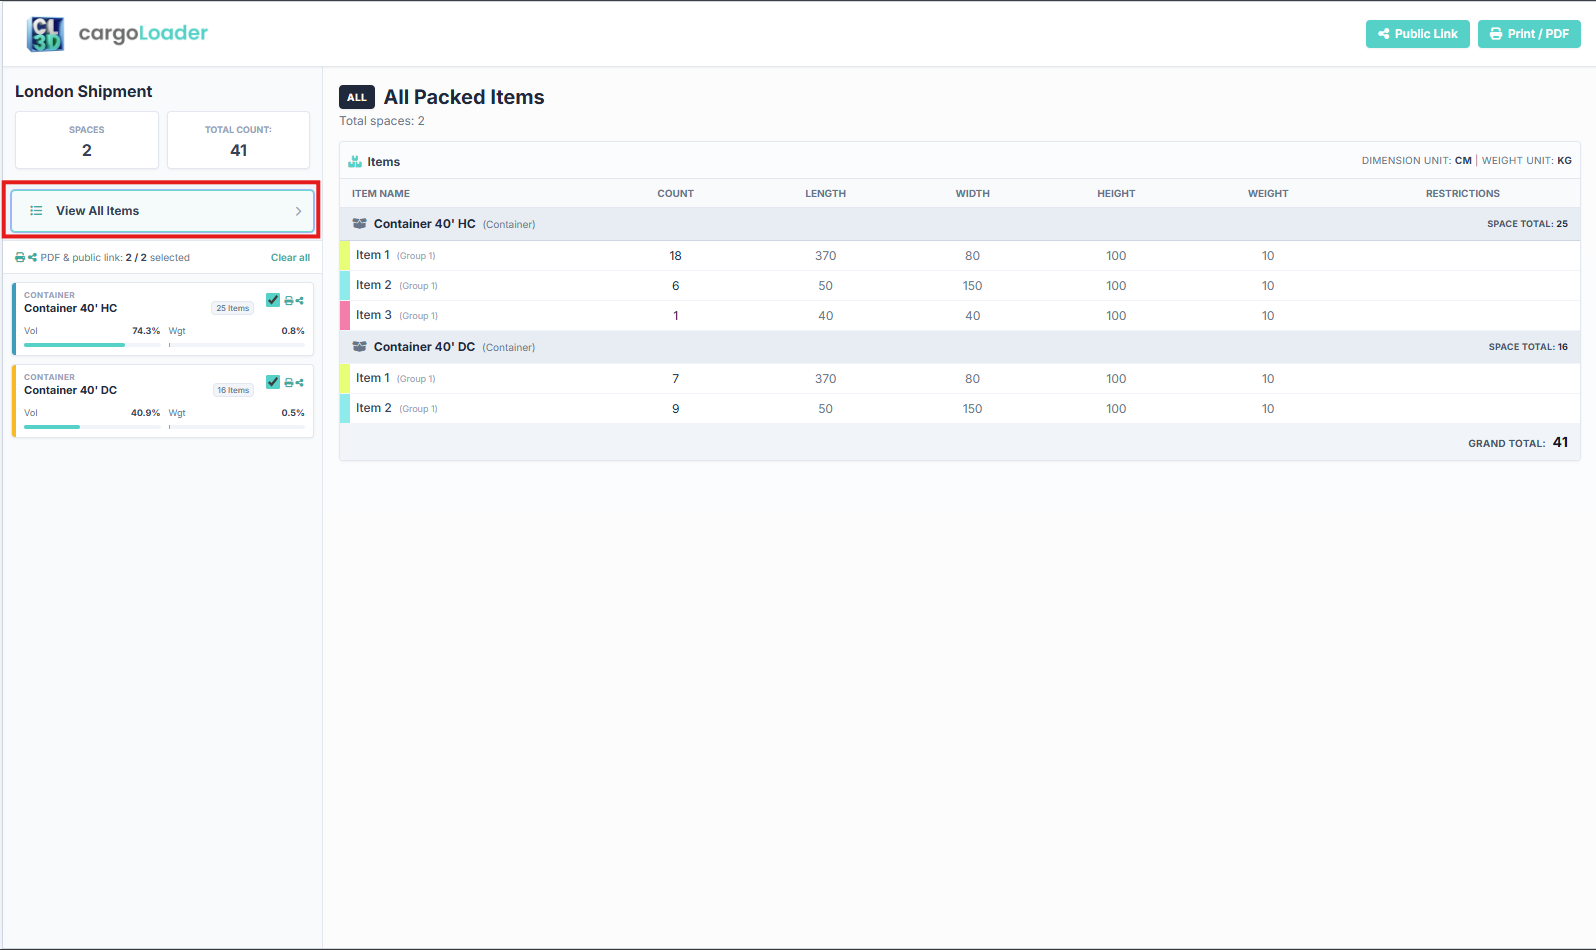
All Packed Items
Sharing Plans via Link:
17. Creating a Shareable Link
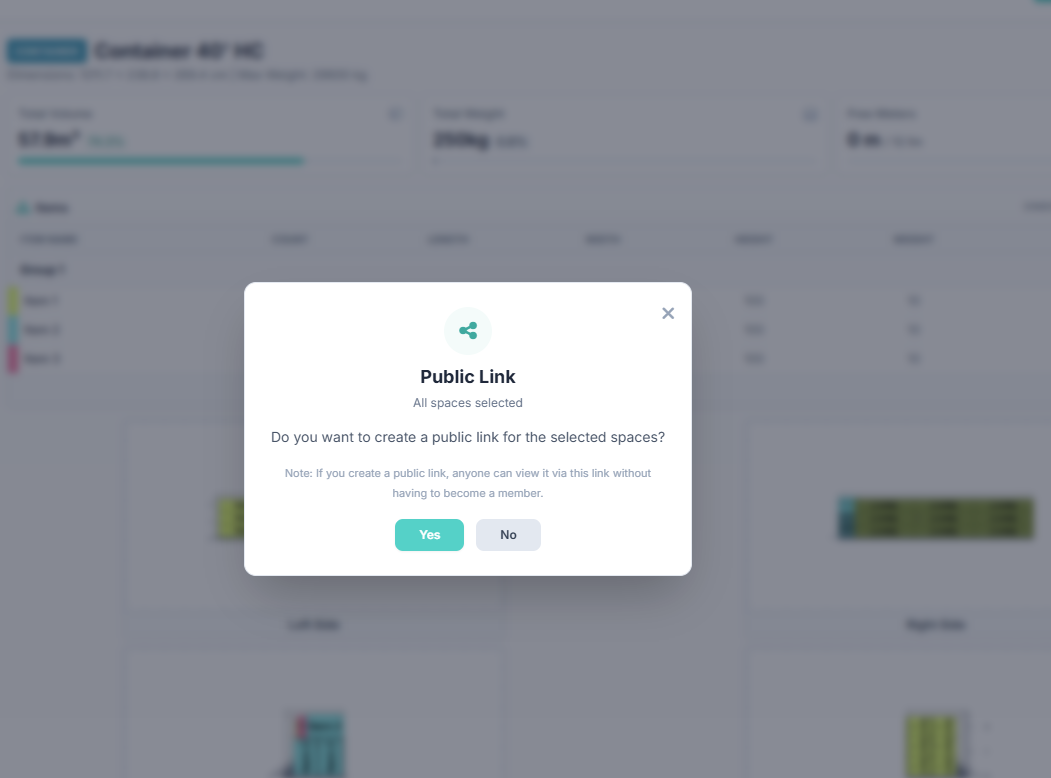
On the Report page, click the Share button in the top right corner. The system will ask if you want to create a public link for the shipment. Confirm to generate the link.

Creating a Shareable Link
18. Accessing the Shared Plan
Create & Share: On the Report page, click Share (top-right). When prompted, confirm to generate a public link, then copy and distribute it. Anyone with the link can view the shipment—no login or registration required. Access remains available only while the sharing user’s license is active; if the license expires or sharing is disabled, the link will no longer be accessible.
Accessing the Shared Plan
19. What Viewers See
- Shipment summary (container details, total volume, weight, free space)
- Item list with dimensions
- 3D visualization of the loaded shipment
What Viewers See
Note: Some functions depend on the selected license type and subscription status.
Help and Support:
For questions about this update or load planning, contact info@cargoloader3d.com
Thank You:
Thank you for choosing CargoLoader3D. We are committed to making load planning fast, flexible and reliable.
Best regards,
CargoLoader3D Family