Major Update | Manuel Placement
New Features:
-
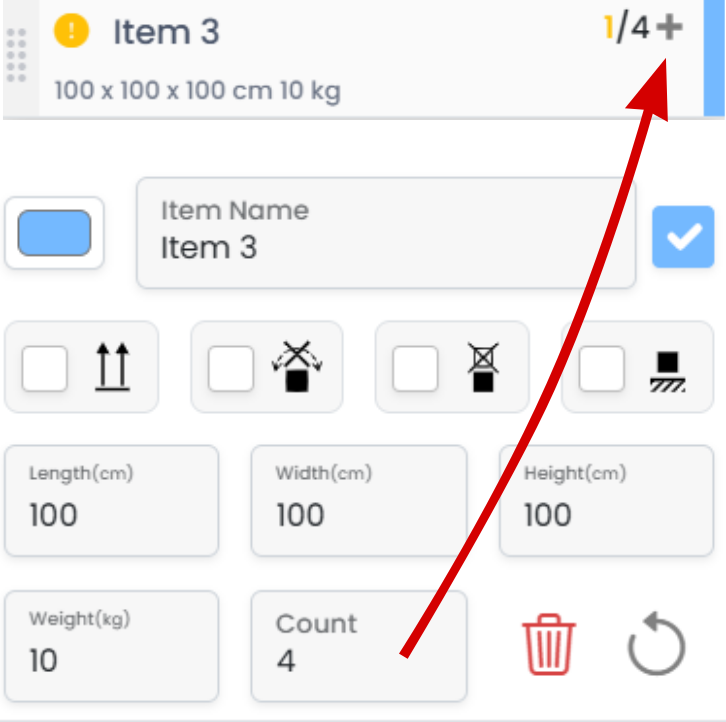
Add Item to Load Plan
You can use the ‘+’ button to add that specific item to the load plan one by one. However, if any property of the item is changed, the button becomes inactive—because the item is expected to match exactly with its version already placed in the load plan. The easiest way to resolve this is to click the ‘Revert’ button, which restores the item’s original properties and reactivates the ‘+’ button.
-
Position Items
Items can be selected with a single left-click of the mouse. After selection, their position can be modified accordingly. To exit the selection mode, users can either press the Esc key or click on an empty space to cancel the selection.
-
Rotate Items
In the Manual Placement mode, clicking the 'Placement' button once activates the rotate mode for the selected item. When enabled, rotation arrows appear on the item, allowing the user to rotate it freely along the X, Y, and Z axes. Clicking the same button again, which now functions as 'Rotate', switches the selected item back to placement mode, so the item can be repositioned instead of rotated.
-
Auto Rotate On - Off
In the Manual Placement mode, a dedicated button has been added to enable or disable the Auto-Rotate feature. When Auto-Rotate is active, the selected item will be automatically rotated while being moved to ensure it fits within the available space, regardless of its original orientation. If Auto-Rotate is turned off, the system prevents the item from being placed in areas where it does not fit and does not automatically rotate the item during repositioning.
-
Delete Item Or All Items
In the Manual Placement mode, two buttons have been added to allow the deletion of one or multiple items. When an item is selected, users can delete a single item or multiple items at once.
 Remove Selected Items From Load Plan.
 Remove All Items From Load Plan.
-
Continue Button
If the counts of existing items are increased and/or new items are added to the item panel, the Continue button will appear on the Load button. Clicking Continue will automatically include any remaining items in the load plan in the most optimized way—without disturbing any manually adjusted items.
Tutorials
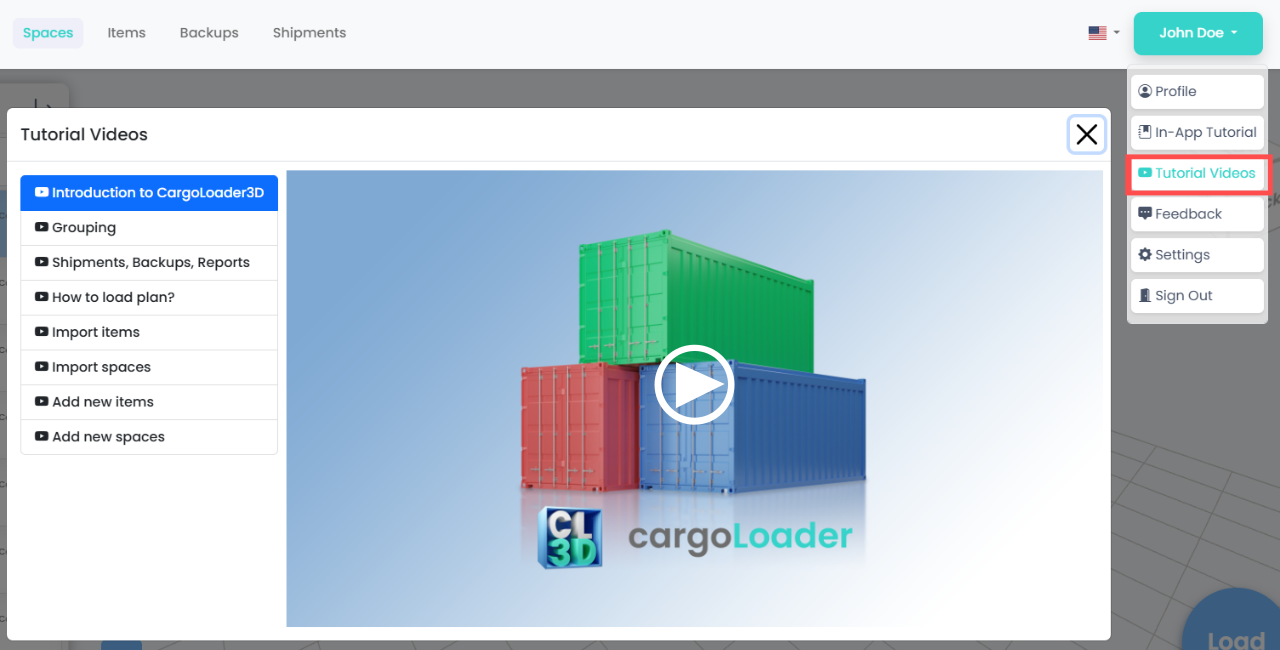
Tutorial Videos:
In the application, you can access the tutorial videos by clicking the ‘Tutorial Videos’ button in the profile menu located at the top right corner of the page.
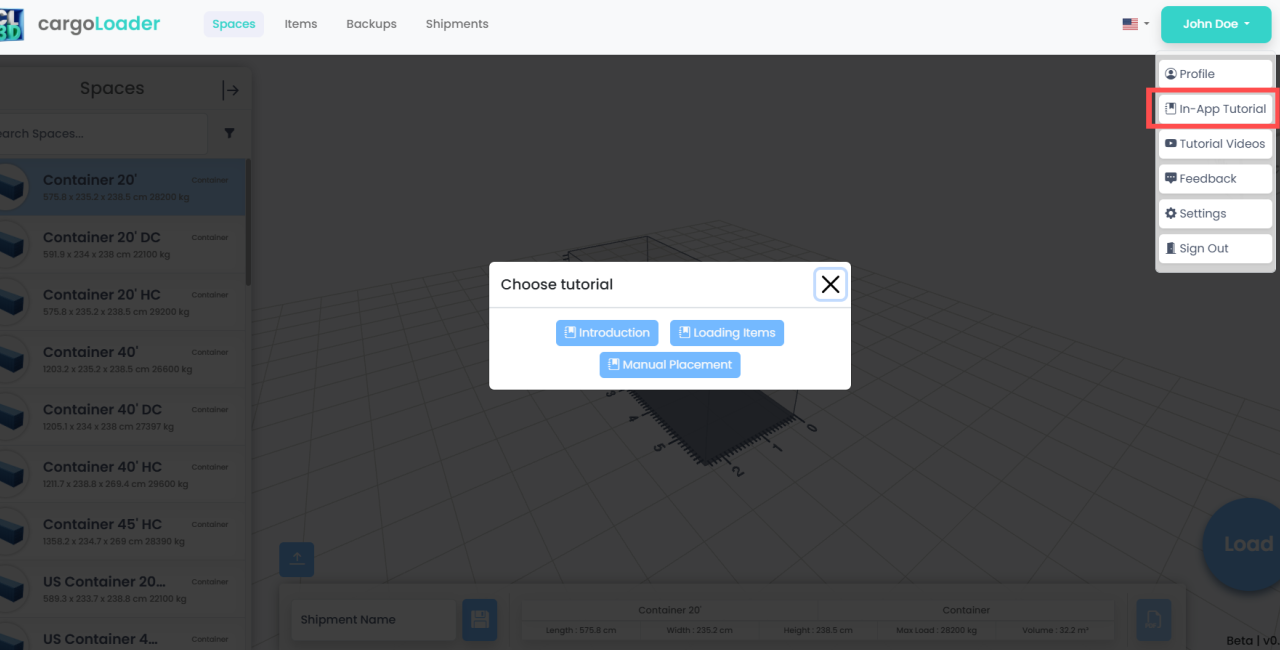
In App Tutorial:
To access interactive tutorials, go to the profile menu in the top right corner of the application and click the ‘In-App Tutorial’ option.
Improvements:
- Performance improvements have been made for textures, the ruler, fonts, and the rotation cube.
- Save speed has been improved.
- The grid has been removed from the images in the Report screen.
- The '+' and '–' buttons have been removed from the item panel.
- The 'Loaded / Not Loaded' labels have been changed to 'Loaded / Remaining' and now display real-time counts.
- The center of gravity height is also displayed.
- Full save support has been added for all item rotations.
- The center of gravity, load, remaining distance, available space, and axle data are automatically updated based on any changes made.
- Relevant warnings are displayed where necessary when changes are made.
Help and Support:
Should you encounter any issues or have questions, please don't hesitate to contact us. Our support team is ready to assist you. Reach us through:
Email: info@cargoloader3d.comThank You:
We appreciate your use of cargoLoader. We are committed to providing a seamless experience, and your feedback is invaluable. Please share your thoughts on the update and any suggestions for future improvements.
Best regards,
cargoLoader Family